

I’ve yet to meet a serving tray I didn’t like. From small to big, simple and understated to bright and fun, I love the diverse functionality of trays with their ability to be used in a wide range of tasks. They can be used to serve snacks to the ones you love, or just sit on a table holding treasured possessions — their possibilities are quite endless. In today’s tutorial, a basic white melamine tray (you can find one at Target for $12.99) is given a fun face lift with office supply stickers in bright neon polka dots and a quick coat of Mod Podge.

All you’ll need is a plain white tray (feel free to use melamine or ceramic, both will work just fine), office supply stickers which you can find at any office supply store, bottle of Mod Podge in Gloss finish, an application brush, and a ruler.
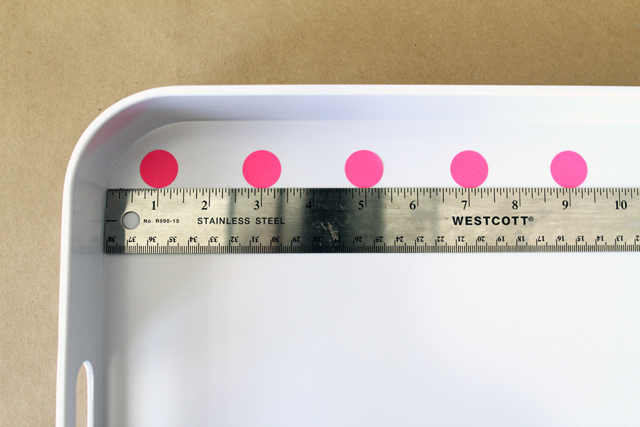
Begin by placing your first sticker in the upper left corner of your tray and begin plotting out a course from there. Since this tray was 13″ x 18″ I figured spacing each row and dot 2″ apart would work out perfectly. I didn’t bother marking the space where each sticker should be placed, although you definitely could if you want to be extremely precise. I am not always the most precise person, so I just held my ruler straight against the side and placed them at each 2″ space, and it worked out fine for me and my tray. After I had my first row of pin across though, I did place a vertical row of dots down the left side so I could have a guideline.
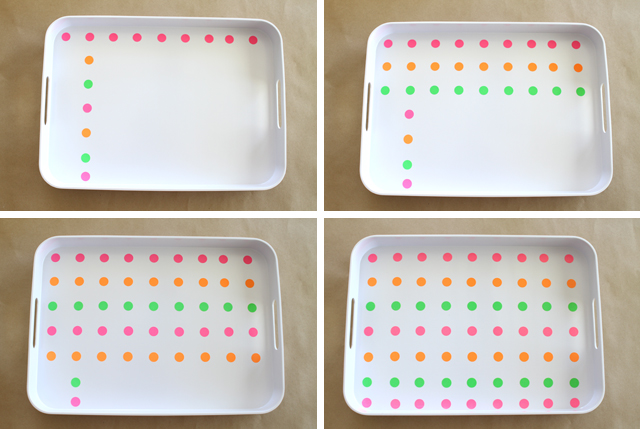
Once my stickers were in place, I was ready to Mod Podge. By adding a layer of Mod Podge I ensured that the stickers wouldn’t peel off or tear over time.
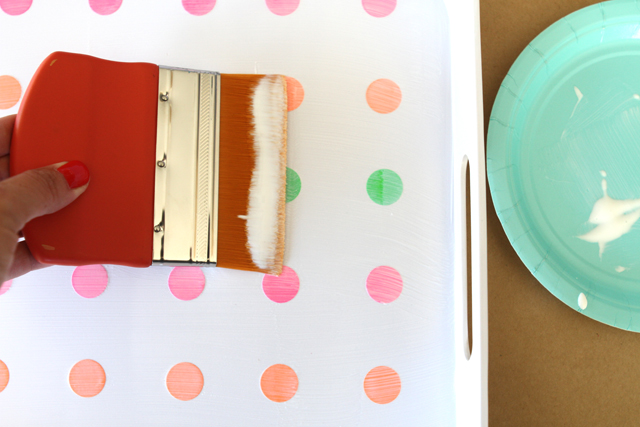
If you’ve never worked with Mod Podge before, you will notice a filmy layer over your tray. Don’t fret, it will indeed dry clear. Still, make sure you apply a thin layer and apply in even strokes. This fine, wide brush was the perfect type of brush to use to achieve minimal brush lines.

Let your tray sit for a few hours before using it or placing anything on it, and once dry it’s ready to be used. I wouldn’t serve food directly on the tray since it will come into contact with the Mod Podge, which isn’t toxic, but is still a type of glue. To care for your tray clean with a soft cloth and warm soapy water. I wouldn’t recommend putting it in the dishwasher.
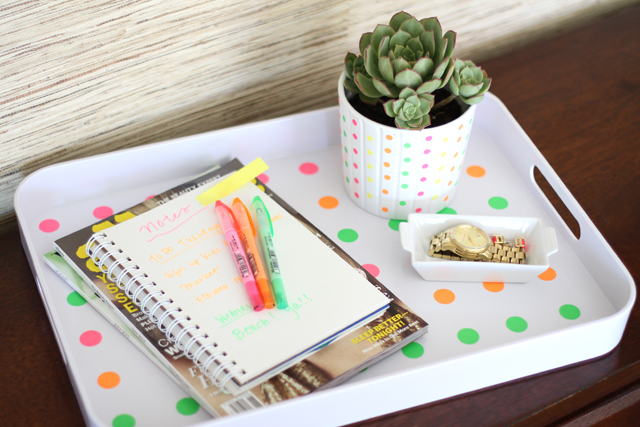
While it certainly makes for a cute snack serving tray, I especially love it on my nightstand to hold my note pad, magazines and odds and ends. It gives my usually dull bedside table an unexpected pop of color. You may notice the smaller dots I used on the potted plant. I originally planned on using these small dots in combination with the large dots on the tray, but I couldn’t find a pattern I was happy with that didn’t look too busy or fussy, so I used them on a set of plain white pots from IKEA instead (here’s the how-to). The pots turned out great, like the tiny polka dot stickers were meant for them.


47 comments
Barb
I love your animations! I read in one of your posts about using a towel/fabric for a photo shoot. I’m looking for more regarding backdrops/photo shoots! Very nice blog – Thank you!
Cassie
CUTE! And so inexpensive, too. I love frugal decorating ideas like this one. Thanks, Nicole. :)
happytime
Love it!!!
Chez Violette
Very nice tuto with a cute animation. Thank you !!!
neo
Love this. My baby girl’s room is decorated with polka dots and this would be a great addition.
Bargainmoose
Hi there!Love your blog, SO creative! I’m really digging what you have done to this tray…It’s so simple and so cute, I wish I thought of it first! I have been looking for something colorful to spruce up our balcony and I think I found the perfect project! -Kate
Sarah Gunn
What a cute, yet simple, idea. Love it!
Cora
This is such a cute idea and perfect for my daughter’s upcoming circle themed birthday party. I might even get her to help me place the stickers. Thanks for the inspiration.
Zoe W.
Lovely. And so simple! I’ll be trying something similar this weekend. Thank you.
how2home
This is such a brilliant DIY idea! I’ve never used Mod Podge before but this is one of those items DIY-er swear by….is it easy to work with?
Callie Grayson
Sweet!
Xx
Callie
Nat @ Dear Little House
Very sweet!
Monika / MB Captured
I really love this little creative project, more so with the matching pot! A great job for a rainy Sunday. Xx
Melissa
Brilliant idea. I’m going to have to check out that modge podge brush. looks amazing.
Miss B.
Forget the tray, where did you get such a cute glue brush?!!! Awesome d.i.y. as always!
Andrea Howe
haha you’re so cute Tristan! Too bad you’re no longer in my state ;) It’s actually a Mod Podge brush made specifically for using with Mod Podge and it’s awesome! I got a bunch of their stuff from their new line c/o Plaid and I’ve been pretty impressed. I’m a Mod Podging queen these days!
Angeline
Love Love!
eskimo*rose
Such a cute easy idea – funny I was just telling a guy last week that he should use white dot stickers to decorate a bowtie … he needed it for a dress up party to go as Winston Churchill – oh the uses of dot stickers are endless!!
Weiya @ enjoyer of grace
I love this tray!!! What a great way to use those stickers! Can’t wait to try this myself now! :D
agnes szucs / iiiinspired
hey, that’s a really cool idea! would be very nice with black dots, too… the scandinavian way…
xo
agnes
:)
Elizabeth @ The Little Black Door
So sweet! I’m definitely pinning this!!
Celeste @ Our Fabulous Life in the Suburbs
Umm, I love this idea! So simple! Definitely adding this to my to-do list :)
Patricia
very sweet, i saw this somewhere else, i’m definitely making it but using ceramic plates (appetizer sizes) as jewerly trays. Yours turned out lovely!
Sinead
What a super fun idea! Would love this for summer parties.
Julia @ life on churchill
Love! And so simple too, thanks for sharing!
AM lives at whitehouseblackshutters.com
This project is so happy and cute. And simple! I think that’s the best part. :)
Katie
Cute!
Megan F
So, just checking since I’ve got limited Modge Podge experience (and maybe I can just Google to find out, but can you actually put food ON the tray? Or would it have to be on a plate on the tray? Cute idea tho!
Megan F
Ack, how did I skip RIGHT over the paragraph that explained that part? I promise I tried to read it first!
Amanda
I love this project! Simply Charming! And the little motion stop animation was really great! I want to go home and make one right now :)
arundati
what a brilliant little DIY
Yadira Batres
That’s so adorable,
I love it so cute.
good job
Yadi B.
Comments are closed.