
First, I want to thank you all for your support in the 48-Hour Challenge! Our porch is back in the lead again, but it’s close and every vote definitely counts. Thank you all, especially those of you that are voting every day from now until June 12! I really appreciate it.
Today, I thought I’d explain how to make the hanging divider that we created for our front porch.
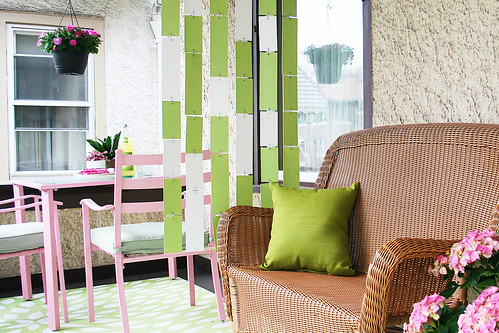
Materials
- 2’x4′ piece of hardboard
- two wooden dowel rods
- s-hooks
- chain
- paint
Tools
- table saw (or circular saw, or jig saw)
- drill
- cabinet knob template
- pencil
- paint brush
How To…
You can do something symmetrical or random, so it’s helpful to plan out a pattern (you can use graph paper) before beginning. We started by cutting our hardboard into long strips (3″ wide), and then cutting the strips into shorter pieces (ours were 6″ and 10″ long).

Once we had our pieces cut, we made marks for our hooks using a cabinet knob template. After drilling for the holes, we painted the front and back of each piece.

We assembled the strips with s-hooks and hung the whole thing from a dowel rod and some chain. We also added another dowel rod along the bottom for more stability. We’re actually planning to reinforce the connections with wire to help the divider weather strong winds. If the hooks were easier to bend, we would have bent the ends to hold it all together a bit better. If you’re using the divider indoors though, the extra step wouldn’t be necessary.

There you have it! And you can easily customize the project by making it more random, switching up the colors, using different shapes, and so on. You can even add in other materials — there are great metal parts in the plumbing section of any home improvement store. I hope that inspires some of you to try your hand at your own hanging divider!


39 comments
HollyP
What a fabulous idea! I wanted a way to add some privacy to my sunporch, without loosing the airy feeling. This is a winner in my book.
Liz Turner
LOVE your makeover. Have realy enjoyed readying your blog. Keep making things lovely!
Tiffany
This is really awesome. I have been wanting to get a divider to separate the “pet area” in my living room, but it just seems so pricey for something so trivial and the cheaper alternatives usually don’t look that great. THIS is gonna save me some dough AND look awesome.
monica
I’m definitely going to try this with some leftover plexiglass pieces. Thanks! Love your blog — and your fabulous design.
I’ve nominated you for The Lemonade Award! You can pick it up on my blog here: http://www.craftynest.com/2009/05/the-lemonade-award/ Congrats!
Barbara Brazil
Don’t worry, you’re doing fine, I’m placing my vote everyday! Fingers crossed!
April
I was going to email and request this last night, but I got busy. I’m so glad you posted this!
Andrea
absolutely beautiful, yet such a simple idea
The Antiques Diva
What a simple and chic idea!! I love it!!!!
Caryn
I love the divider! Especially how it works with the pink! I added the Vote page to my home tabs so I remember to vote every day! I hope you win it!
daily decorator
That divider was one of my favorite things about your porch makeover (right up there with the floor)! I’m glad you are winning at the moment! Hi to new baby!
KellyA
Thank you for posting the instructions. I love that divider!
Emma
I keep voting for you every day! it is the first thing I do when I have my tea in the morning.
luuvely
i keep voting for you guys…really nice porch!
and although the divider is like super duper fantastic…i couldn’t use a table saw the save my life…well maybe to save my life..but lol…you get the point…
really great makeover..my favorite part is the RUG! :) super cute..
Roberta
Voted for you! again! kisses from Italy! :-)
Brandie
Thanks for sharing. I think this was my favorite part of your redesign … well, this and the painted “rug”.
Rachel
Yay, thanks so much for sharing this! I love it every time I see it. I’ll be linking.
Tracy
I’m voting for you on a daily basis :) And I hope you guys win the prize.
I love that divider, and you just made my day by writing the how-to’s to it!
Thanks and have a good day.
Heidi Harlequin
I love this idea!
And I also love the colors.
And I voted!
I wish you all my best.
Heidi
Thanks for posting thost directions because I love that divider
Catherine
Thanks for reminding me to vote! Really hope you guys win :) Yours was by far, truly the best.
Lori Danelle
Thanks for sharing this! So simple, but so effective. There’s a good chance this idea will be showing up in my house. . .
http://loridanelle.blogspot.com
Franziska
I like it – it’s a nice idea! And I like the colours, too!
Katie
You make everything look so easy! It’s absolutely beautiful.
Alli
great divider. I thought it was pieces of plexiglass at first. I think it would also look great with plexiglass that has a coat of paint on one side, it would give sort of a glass tile effect that could be neat. Love the porch, good luck on the contest!
Nuit
I am voting!! I can’t stop looking at your porch areas, what you’ve done is truly fantastic. And you will win.
Martina
Please keep reminding me to vote! Your makeover is without-a-doubt the best but I keep forgetting to vote everyday. I hope you win!
jennifer
voted for you! good luck, I’m sure you will win :)
Lovely Job!
Comments are closed.