Archive - May, 2009

One Month Old (Eleanor’s Monthly Photo)

Here’s our little cutie wearing the pin that mama made for her.

One Month Old

Happy one month birthday, Eleanor! I can’t believe how fast the time is going by and how big you are already.

(I’ll be taking a photo of Eleanor sitting in the Eames rocker and wearing her pin each month until she’s two years old.)

View All of Eleanor’s Monthly Photos

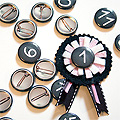
Felt Pin with Interchangeable Center

I’ve been planning to take a photo of Eleanor each month, and I wanted a way to mark each one for easy identification. I ran across a prize-ribbon tutorial recently, and I was going to make one but I didn’t have the right kind of ribbon. Sure, I could have gone out and bought some, but I had a sleeping baby in the house and a desire to make something now. I ended up rummaging through my craft closet for supplies that I had on hand and I came up with a felt version instead.

Finished Pin w/ Numbers

First I cut two matching circles out of pink and white felt.

Tracing Circles

Then I cut a slightly larger circle out of brown felt with pinking shears (using one of my pocket mirrors as a template).

Cutting w/ Pinking Shears

Next I marked an asterisk pattern on the pink felt circle, stacked it on top of the white circle, and then cut out eight triangular points.

Cutting Parts

I chose a few cute ribbons to form the tails…

Ribbon for the Pin

Then I hand stitched all of my parts together and formed the body of the pin.

Sewing the Pin

I could have stopped there or sewn a button in the center if I just wanted to make a cute pin, but I wanted to be able to change the center each month for Eleanor’s age (in months). Since I have ready access to a button machine (I make pins and magnets with it for my shop), I decided to make 24 numbered buttons. May as well make this a two year photo project, eh?

Punching Out Buttons

Now I can just swap out the center each month and Eleanor can wear the correct number on the pin each month for her photo!

Finished Pin w/ Numbers

The Porch Rug (Revisited)

I thought I’d talk about painting the porch rug in a bit more detail today. So many of you loved the project (thanks!), and it really is something that can be easily done in your own home if you’re so inclined.

front porch before and after

I started by sketching the pattern on paper first. As I had mentioned before, I was inspired by a rug from Urban Outfitters (no longer available) and the flower petal patterns my Grandma Rose used to draw with me.

Gathering Ideas for the Front Porch

Once we were ready to begin, Brandon and I cleaned the porch and marked off the area for the rug with painter’s tape. We didn’t sand the floor first, though I’d recommend it if you have the time. Two coats of the base color (green) came next, and then it was time to figure out how to get the pattern drawn out on a large scale.

Painted Rug in Progress

I ended up putting in some rough guidelines with white chalk. I focused on placing the flower centers where I wanted them and then sketching out the general movement of the petals from there. I then painted everything freehand, stepping back every so often to make sure that the petal shapes and sizes were remaining consistent.

Painted Rug in Progress

If you’re considering a similar project, I’d say just go for it! It’s just paint — you’ll get a huge impact for very little money. And painting the rug while nine months pregnant was difficult (to say the least), but if I was able to handle it then the more able-bodied among you should have no problem!

Front Porch

If you liked my porch redo (all done in 48 hours with just $500), please take a moment to vote for it. There are two and a half weeks left, and I’d really appreciate your support during this time. And remember, you can vote once each day!

Five Years

Happy anniversary to the man that makes my heart go pitter patter… and who helped create our little girl whose feet will be going pitter patter throughout our home.

Brandon and Eleanor

Up for the Challenge: Part Five

My last post for the Better Homes & Gardens 48-Hour Challenge went up today, and it’s all about how we’ve been enjoying our front porch since it’s completion. I have to say, we’ve been enjoying it very much. :)

On the Front Porch with Eleanor

Murray likes to spend time out front with us too.

On the Front Porch with Eleanor and Murray

Several neighbors have dropped by to offer their congratulations while we sit out front, which is very nice. Of course it was hard to be subtle about our new arrival when we had a six foot tall stork on the front lawn.

The Stork Came to Visit

There’s still plenty of time to vote for your favorite project at BHG.com. If you like the way our porch turned out, you can vote once each day for it!

Page 1 of 3123»