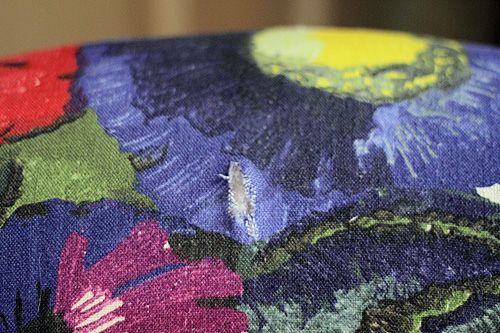
I wrote about the floor model chair that I picked up for half-off yesterday. It had a 2″ tear along the top (not along a seam), and I asked if it seemed like something that can be fixed.
I called Anthropologie to see if they could offer a better discount (no), but they did say that I could still return the chair even after attempting to fix it, so I figured I had nothing to lose by trying. Many of you recommended keeping the orange chair that we already own, and having it reupholstered for a new look. I like the shape of the new chair more though, I love the fabric, and if I sell the orange chair I can essentially swap chairs at no cost. Then if I decided to reupholster the new chair at some point, I’m not out any more money than I would be had I reupholstered the orange one.
I went to the fabric store for mending supplies and came home with an embroidery hoop and some fabric to practice on, various liquid stitch adhesives, Fray Check, curved needles, iron-on patches, and several types of thread and embroidery floss.
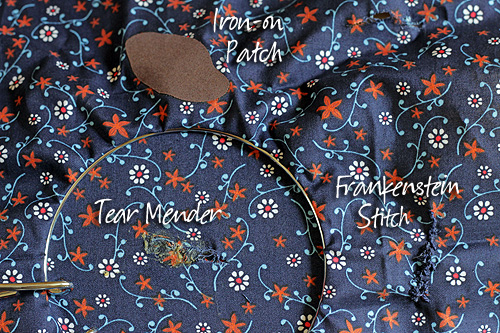
I stretched my scrap fabric on the hoop and jabbed at it with scissors to recreate the upholstery tear. I frayed the edges too for good measure. Then I got to work trying out various methods, keeping the fabric stretched tight on the hoop to simulate the conditions of the fabric stretched tight across the chair back. Here are the methods that I (a novice) used.
Method 1: Darning Upholstery with a Looped Stitch
First, I applied Fray Check, as recommended by this upholstery darning tutorial. Then I used a heavy-weight thread that matched the fabric, and started with a looped stitch. I’ll let my play-by-play Twitter updates tell the story here.
[blackbirdpie url=”http://twitter.com/#!/makingitlovely/status/98945229838749697″]
[blackbirdpie url=”http://twitter.com/#!/makingitlovely/status/98947933138993152″]
[blackbirdpie url=”http://twitter.com/#!/makingitlovely/status/98950876621836288″]
OK, I was trying to be cute with that last bit. The Frankenstein stitching was somewhat charming, but not enough to actually use it on the chair. And I did figure it out toward the end, but it still wasn’t a good enough fix and I was worried that the extra tension would eventually rip the fabric further.
Method 2: Trying to Glue the Fabric Back Together
I thought that I could slip a little fabric under the tear and then glue in back together. I had actually called a local upholsterer for advice and this was the technique that they recommended, so I tried it. Messy and awful. The worst of it was a product I found (that sounded promising!) called Tear Mender. It was a rubber-cement like adhesive that smelled awful and gummed up my fabric. I think it could be great for thicker fabric or leather, but it was terrible for my linen. I tried a few other liquid stitch products, but none with good results.
Method 3: Patching the Fabric
There were two options for patching. One: I could cut out a matching portion of fabric from my chair’s armrest covers, glue it over the tear or iron it on with fusible mending tape, apply Fray Check to the ends, then stitch around the patch to secure. Or option two: slap an iron-on patch over the rip. To my surprise, the easier option worked! The patch fuses completely to the fabric, bonding to the ripped portion and preventing the tear from getting worse. And even better, the edges of the mending patch won’t fray so there’s no need to stitch around the edge (which calls more attention to the repair).
It’s not invisible (and I never expected that it would be), but it looks like it’s just part of the chair’s busy pattern. And as I had mentioned, the tear takes away some of the chair’s preciousness, which isn’t such a bad thing. I could even blend the patch by using fabric paint to match the pattern, but I don’t think that will be necessary.
One Last Option
I can pile on the pillows and a throw blanket. Sure, there’s no room to sit, but look how cute it is.
I kid! The chair’s going to be just fine.






Erika
August 4, 2011 at 12:14 pmLooks good. Glad turned out for the best. I kept thinking the whole time I was reading that the pattern would probably hide an iron-on patch. And, well it does!
michele
August 4, 2011 at 12:32 pmlooks great, wasn’t sure if you did already or not, but what if the patch was a lighter color and fabric painted to match the surroundings?
Katie
August 4, 2011 at 12:41 pmOh, it looks great!
Meredith
August 4, 2011 at 12:51 pmI’d never notice it with the bold pattern. And even if someone did, it’s still worth a 50% discount!
Nice job.
Amy Kelly
August 4, 2011 at 1:02 pmMaybe it’s more noticeable in person, but I honestly thought “Wait, where’s the patch?” and had to look back at the photo of the original tear to even be able to distinguish where the patch was on the mended chair. I’d say that’s a job well done!
Making it Lovely
August 4, 2011 at 1:16 pmI think it’s actually more noticeable in the photo than it is in person! The crazy fabric pattern is really forgiving.
Kelley
August 4, 2011 at 7:51 pmI did the same thing! I was all “O.K. the tear is on the light blue part of the flower above the leave thingys.. *scrolls back down*… Ohhhhh!”
It looks great Nicole!
Kelley
August 4, 2011 at 7:52 pmLeave? Leaf, maybe?
Dee
August 4, 2011 at 11:37 pmMe too – had to go back and forth between photos to even find it! Amazing good job!
RebeccaNYC
August 6, 2011 at 8:53 amgoing back and forth between photos and I still can’t find the patch. terrific!
Danielle@Newlyweds Paradise
August 4, 2011 at 1:13 pmHoly cow! I didn’t even notice it! It looks like a brand new chair! Great job and you got it half off!
Cathy
August 4, 2011 at 1:15 pmA perfect solution! Love how it looks with the pillows and the throw, such a fun chair!
Cathy
Danielle
August 4, 2011 at 1:17 pmLooks awesome! I seriously had to study the before and after shots to even see where you applied the patch. I am definitely going to start prowling the stores for damaged floor merchandise!
Rebecca @ beautiful square feet
August 4, 2011 at 1:22 pmLooks great – well done! I love that you’re brave enough to put that multi-coloured cushion on it too! It works really well with the other plainer, paler cushion and throw.
Mirakel
August 4, 2011 at 1:29 pmIt looks great! I had to go back and forth (before/after) to figure out where the patch was! Glad you experimented with your options, don’t know where you’d use that Frankenstein stitch! I also love “dinged” purchases, that way you don’t feel bad when the kids/pets ding it (and it’s cheaper!). Good job!
Jen & Katie
August 4, 2011 at 2:00 pmYou’re brave to attempt fixing it! We probably would have still bought the chair and lived with a blanket over it for it’s whole life. We absolutely love it though!
diane
August 4, 2011 at 2:13 pmglad you solved the problem
Arianne
August 4, 2011 at 2:14 pmI had to stare at the photo a while too – totally not obvious! So glad you got it worked out.
Lora D.
August 4, 2011 at 2:20 pmOMG! you have THE pillow. (from Fine Little Day) I really want that. Are the colors pretty vibrant in person? I hope so. Did it really take 8 weeks to arrive? Thinking about ordering it. But I’m not sure. Wish I could see it in person. It’s a little pricey for my budget, but I love it onscreen. Hmmm ?? What to do.
Making it Lovely
August 5, 2011 at 2:29 pmI think it took 2 weeks or so to arrive. It’s such a happy, fun pillow!
Lora D.
August 4, 2011 at 2:22 pmOh and the chair is fabulous!! Nice job on the repair. Blends in nicely. So worth the savings!!
Miss B.
August 4, 2011 at 2:27 pmI can’t believe how resourceful you are. I would never have the guts to try this, nor make that chair look as great in my home. I am always so impressed by you! When are YOU getting a book deal so I can learn how to be like you.
brooke
August 4, 2011 at 2:36 pmFabulous. I might try the patch next time.
Gretchen
August 4, 2011 at 3:29 pmIt looks good – but didn’t you say you had some arm covers that came with the chair? Why didn’t you make a patch to match the chair. You can buy fusible webbing to create your own patch. If you decide at a later time that you don’t like the patch you’ve used, you could always patch over it using the same fabric.
Making it Lovely
August 5, 2011 at 2:31 pmI didn’t want to deal with the ends possibly fraying with a self-made patch, or to sew the edges down.
The Glamorous Housewife
August 4, 2011 at 3:30 pmIt took me a while to find the patch in your photo! You did a wonderful job, and I really enjoyed the ‘journey’ from beginning to end.
Thanks doll,
The Glamorous Housewife
Melissa | IS•LY
August 4, 2011 at 4:59 pmFabulous job, Nicole!! Way to do your research.
Lesley
August 4, 2011 at 5:20 pmWell done! I was going to suggest slipping a bit of the iron-on fusible tape in and under the tear and iron it so the tape ends up on the inside where it can’t be seen, but you’ve done a great job. I love the chair, it looks fantastic.
Margaret
August 4, 2011 at 7:44 pmYay.
I had to search for it too.
Have you thought about slapping on a few more in random locations? That would make it, ahem, “textural.”
Stefan
August 4, 2011 at 7:52 pmMixing patterns scare me but I love the way the colorful stripe pillow plays off the crazy floral. Good for you for the fix, now it is even more special.
Polina
August 4, 2011 at 11:29 pmNice job on fixing the chair! You mentioned that you can sell the orange chair for $800 for an even swap. We just sold our loveseat for $150 so i am pretty shocked that someone will pay $800 for a used chair. Maybe secondary market is better in your city.
M
August 5, 2011 at 12:45 pm$800 is a whole lot for one chair that needs mending. But I guess if its an investment piece & you LOVE it…. I agree though about the resale of the original orange chair. You should post it on the blog; maybe the prominence will add to its value.
Bethany
August 5, 2011 at 9:36 amI couldn’t see it either! Nice job.
Friday Link Love – Fresh Home Blog
August 5, 2011 at 12:58 pm[…] How to: Repair an upholstery tear by Nicole [Making it Lovely] […]
Kat
August 5, 2011 at 2:12 pmYou could turn one of the arm covers into a square of rectangular piece that just drapes over the top.
Heidi S.
August 5, 2011 at 4:19 pmAwesome job! I wouldn’t have been brave enough to attempt it myself.
Olivia
August 9, 2011 at 1:27 pmLooks perfect! And I’m really jealous of your crazy printed chair so I think it’s time to learn how to upholster. -Olivia
A Guide to Mixing Patterns in Your Home | Making it Lovely
July 24, 2012 at 12:08 pm[…] like this one in pinstripes, or maybe something a little crazy like this one in raspberry ikat or my floral grandma chair. It will be easier than you think to make it work! For example, my chair may seem limiting at first, […]
A New (Old) Dresser | Making it Lovely
August 8, 2013 at 2:26 pm[…] lot of our furniture will work well in the new house (my crazy floral chair is going to be so good there), but I feel like we need some more vintage pieces and antiques in the […]
The Double Parlors, Shortly After Moving in | Making it Lovely
September 19, 2013 at 2:06 pm[…] sofa in the next room, and I like having that visual connection, but it does not work as well with the crazy floral chair. And I like my crazy floral […]
Candice
June 7, 2014 at 7:19 amThank you for this post! I just received my new chair and it has a microscopic tear. I was almost in tears as I have two boys who LIVE in the living room–surely the tear will get larger! However, like you, the chair was a major score ($300 for a $750 regular priced). Luckily the tear is on the solid cream background so I’m buying a patch today–now I have to find the iron! Thanks so much for the great instructions!!!
Sweet C.
May 5, 2016 at 10:44 amSorry I know this post is old but I cut off the tags to a new pillow and the fabric ripped (similar to your chair, frayed kind of). I am trying to figure out how to fix this and stumbled upon your post. I’m not sure I understand what you mean by “slapping on an iron-on patch”? Do you just get a patch similar to these (http://www.walmart.com/ip/Dritz-55277-Iron-On-Twill-Patches-5-inch-x-5-inch-4-Pkg-Pastels/37740261?reviews_limit=10&) in the same color (looking at you eggshell white) and iron it on (yes I know this sounds like a silly question but all this is alien to me. I’ve never sewn nor done any crafts, etc.)? It’s in such an awkward spot how do you keep it in place while ironing? Pins?
Making it Lovely
May 6, 2016 at 7:50 amYes, those are the type of patches to get! I cut mine down to size — just a little larger than the rip — and ironed it on. The heat will set the glue quickly, so you can hold one side in place while you start ironing, then move your hand and iron the rest. Make sense?
Reupholstering My Floral Chair with Calico - Making it Lovely
October 12, 2021 at 10:40 am[…] armchair. It was a floor model, and there was a small rip in the linen fabric when I bought it. I experimented with ways to fix it, ultimately landing on a patch that blended pretty well! I was proud of my handiwork, and the chair […]