
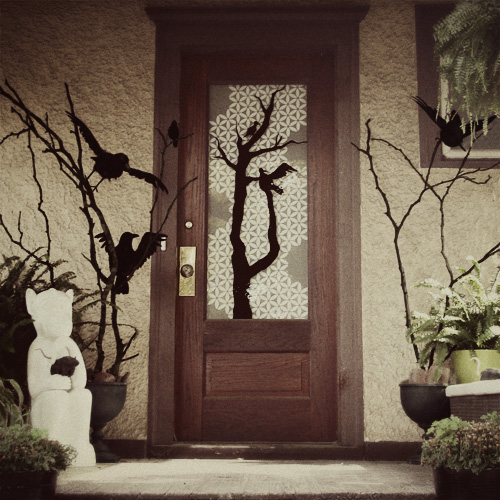
Spooky Halloween Front Porch for BHG
My fourth and final project for Better Homes & Gardens can finally be revealed! I decorated our front porch for…October 26, 2010
Modern Pumpkin Lanterns for BHG
I crafted three modern pumpkin lanterns for my third Better Homes & Gardens project. I painted them in various metallics,…October 21, 2010
Autumn Leaves Napkin Rings for BHG
This is the second craft project I've made for Better Homes & Gardens this fall (the first was the Halloween…October 12, 2010
My Mask in Better Homes & Gardens
Hooray! I knew in an abstract sense that my mask would be in the October issue of Better Homes &…September 27, 2010
Halloween Mask for Better Homes & Gardens
Remember when I mentioned that I would be crafting four Halloween projects for Better Homes & Gardens? Well I'm thrilled…September 10, 2010This Project Made Possible by You!
I’ve created a little banner to identify projects funded by our winnings in the 48-Hour Challenge. We’ve held onto the…October 8, 2009
Spooky Halloween Front Porch for BHG
My fourth and final project for Better Homes & Gardens can finally be revealed! I decorated our front porch for Halloween with 2D and 3D…
Modern Pumpkin Lanterns for BHG
I crafted three modern pumpkin lanterns for my third Better Homes & Gardens project. I painted them in various metallics, and all three are hot…
Autumn Leaves Napkin Rings for BHG
This is the second craft project I’ve made for Better Homes & Gardens this fall (the first was the Halloween mask). I, along with the…
My Mask in Better Homes & Gardens
Hooray! I knew in an abstract sense that my mask would be in the October issue of Better Homes & Gardens, but it was thrilling…
Halloween Mask for Better Homes & Gardens
Remember when I mentioned that I would be crafting four Halloween projects for Better Homes & Gardens? Well I’m thrilled to finally be able to…
This Project Made Possible by You!
I’ve created a little banner to identify projects funded by our winnings in the 48-Hour Challenge. We’ve held onto the money until we could decide…