
I spotted an armoire on Jubilee Furniture’s blog not long after Calvin had been born. I’d been looking for something to replace the storage we lost when remodeling the second floor, and this one was the perfect size. I suspected the quality may be lacking because it was priced at just $35, but it was worth taking a look at.
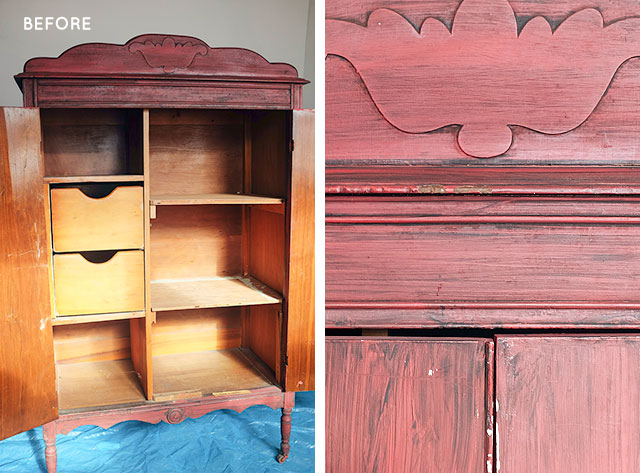
Well, the drawers are wonky, two shelves have been replaced with plywood, and the left door is badly warped. It may not be in the greatest shape, but it does have great lines and it was decent enough to work with — especially since the price was right. That streaky faux-finish had to go though.

Much better! The doors are not perfectly smooth but the armoire has been moved to the hall where the light doesn’t hit it directly, and its imperfections are much less noticeable. I wanted something dark (but not black), so the color I chose was Shaded Fern by Glidden® and Brandon did the painting. But for the inside, I thought, why not have a bit of fun?

Whoa, that’s a whole lot of “fun.” Now you know why I’m calling this a Striped Armoire Surprise! Here’s how it was done. After priming the inside of the armoire, each compartment inside got a different hue. The colors used were Peach Daiquiri (pink), Extra Virgin Olive Oil (yellow), Crisp Linen White, Sea Spray (blue), Shaded Fern, French Stripe Red, and Safari Green — all Glidden® colors.


I used painter’s tape (ScotchBlue™ Painter’s Tape Delicate Surfaces with Advanced Edge-Lock™ Paint Line Protector 2080EL) along with a paper template to mark the diagonal lines on the doors. (The extra pieces you see are the ones I used for the spacing — obviously they were removed before the stripes were painted.) The drawers were painted white and then taped off horizontally with a thinner tape for variation.


I bought a pint of each color in a satin finish, and I have plenty of paint leftover.

After three coats of paint for each of the first half of the diagonal lines, I removed the tape and let the paint dry completely (at least 24 hours) before taping off for the new stripes the next day. It was easier to use the thinner tape this time, aligning one piece to the top of each stripe and another to the bottom, rather than trying to perfectly fit one piece of thick tape along the entire length.


The colors are so bright and cheery! It would be a little much for my taste to do this treatment to the outside, but I love it as a surprise when you open up the doors.


![]()
I am proud to be a 3M sponsored blogger, and, as part of my responsibilities, I get the opportunity to evaluate ScotchBlue™ Painter’s Tape. Opinions are my own and additional products used in the project were selected by me.


30 comments
Kate
I love it!
Jen
SO SO FUN!!
Llou
I love the rug in the photo. Do you mind sharing the source?
Thanks!
Marcee ... ILLINOIS
For a minimal $$, so nice to experiment w/color, have lotsa fun with an old piece of furniture. Makes using it totally enjoyable! I also love the fact Eleanor and August see the artist in their mom and dad …. s’wonderful!! P.S. You did fool me w/Girl Scout green. I figured you were up to something BIG Nicole. Ha! Good work!
Alana
Very cute! I’m a big fan of painting the inside of furniture. It’s a special treat for whoever opens it up. Total happy!
Lex Lemon
I love it, so COLORFUL!
jbhat
I love it. I’d want to just leave the doors open all the time. :)
jbhat
Rebecca
I am honestly amazed how you find the time and energy to do all these amazing things with 3 children. I only have 1 and I can barely manage to hang my clothes up, let alone decorate. I guess all the home projects will have to wait until my toddler is in college.
judy
Nicole-Pure genius! and so darling. I love the idea of one suggestor with your artistic talent why not put a Zebra or teddy bear on the outside with a heart and Calvin in pretty script. Obviously I am not an artist but I know you are.
emily
adorable! such a fun transformation.
sandi m
This is so cute!! Love the inside surprise. A suggestion possibility – would add a touch of whitewash/highlight to the outside decorative areas at the top and bottom which would go with the rug and tie in with the white/fern stripes inside. What would be super adorable is Calvin’s initials handpainted in that top decorative area in the fern.
Making it Lovely
This isn’t in his room, but I do like the idea of a ‘B’ for Balch! Kind of like what I did with these DIY monogrammed trophy vases.
mudslide cookie
Man so many good things at that place! I wish I lived closer:(
Eileen O'Neill
I love this and it should be in a Wes Anderson movie set
Making it Lovely
The colors would have to be a bit more muted, I think. ;)
Laura
Also, the wonky doors give a hint of surprises within. Unless the doors don’t work properly I’d keep them.
Laura
Clever! I love the stripes on the doors that tie all the colors together.
Susan @ Jubilee Furniture
Wow! I hardly recognize the piece, Nicole! It looks fabulous! Well done (and thanks so much for the link to the blog!). Take care!
Making it Lovely
Thanks!
Mimi
Very cute DIY! Can’t believe you only paid $35 even in wonky condition the piece would’ve been more here.
Making it Lovely
It was a great price for it, but a fair one. It really isn’t the nicest of pieces.
Amanda
What fun! It’s like business on the outside, Willy Wonka on the inside.
Making it Lovely
Ooh, yes! I like that.
Jennipher
Wow, this is a seriously great project! It looks wonderful and I love the combination of a classic solid on the outside with a party on the inside. Well done!
Making it Lovely
Like a mullet. ;)
kaycee
Cute and totally not what I had expected inside, but those wonky front doors would drive me insane. Have you considered removing them completely?
Making it Lovely
The doors are really wavy. I would consider replacing them with new ones, but it’s really not as noticeable now that the armoire is in the hallway. The light is much dimmer and way more forgiving.
Lisa
It’s also fun making stripes using Scotch’s washi tape! It’s so easy to change too. Your painted version is great. What a fun surprise!
Making it Lovely
Ooh, that’s a good idea! So easy to switch up.
Comments are closed.