

Have a Seat (or Two, or Three)
Brandon gave me a new Eames chair for my birthday! And a Panton. And a few more by Arne Jacobsen,…September 24, 2009
Working With Digital Paint Swatches
Here's a question from my recent FAQ post. Nicole wrote: Maybe this is a silly question, but how did you…July 23, 2009
Picking Perfect Pink Paint
It's no secret that pink is my favorite color, and I believe that pink can be a beautiful wall color…July 20, 2009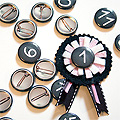
Felt Pin with Interchangeable Center
I've been planning to take a photo of Eleanor each month, and I wanted a way to mark each one…May 26, 2009
The Porch Rug (Revisited)
I thought I'd talk about painting the porch rug in a bit more detail today. So many of you loved…May 25, 2009How To Make a Hanging Divider
First, I want to thank you all for your support in theMay 18, 2009
Have a Seat (or Two, or Three)
Brandon gave me a new Eames chair for my birthday! And a Panton. And a few more by Arne Jacobsen, Eero Saarinen, and Mies van…
Working With Digital Paint Swatches
Here’s a question from my recent FAQ post. Nicole wrote: Maybe this is a silly question, but how did you get the paint colors off…
Picking Perfect Pink Paint
It’s no secret that pink is my favorite color, and I believe that pink can be a beautiful wall color when chosen well. Unfortunately, it’s…
Felt Pin with Interchangeable Center
I’ve been planning to take a photo of Eleanor each month, and I wanted a way to mark each one for easy identification. I ran…
The Porch Rug (Revisited)
I thought I’d talk about painting the porch rug in a bit more detail today. So many of you loved the project (thanks!), and it…