I rented two wide angle lenses this week: a Canon EF-S 10-22mm f/3.5-4.5 USM and a Tokina 11-16mm f/2.8 AT-X 116 Pro DX. I wanted to try them out to see if that might be the next type of lens I’d like to own. They are certainly not for everyone. They’re pretty much limited in use to interiors, landscapes, group photos, and not much else. Since I do photograph interiors though, a wide angle lens would be a very useful thing to have.
Take a look at August’s nursery, as seen through my usual lens.
my typical lens, a Tamron 28-75mm f/2.8
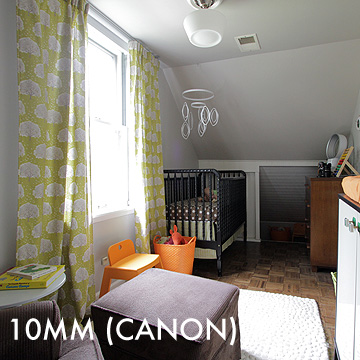
I was squished with my tripod in the back corner, and that was as much of the room as I could show you. Now, going wider and wider (but not moving my tripod), check out what these lenses can do.
Canon EF-S 10-22mm f/3.5-4.5 USMTokina 11-16mm f/2.8 AT-X 116 Pro DX for CanonTokina 11-16mm f/2.8 AT-X 116 Pro DX for CanonCanon EF-S 10-22mm f/3.5-4.5 USM
Nice, right? I liked both lenses, but I think the wider focusing range of the Canon would be more useful. That f/2.8 on the Tokina is tempting, but I’d likely be using this type of lens on a tripod for still shots, so it isn’t as important to have that low, fixed aperture as it would be with other types of lenses.
Have you ever used a wide angle lens? Or a fish-eye (they get a similar wide shot, but with more distortion)? And did you know you can rent lenses? It’s such a great option. I’m glad I can rent again until the day I plunk down the cash for a wide angle lens of my own.
That’s me and my little sister, Ashley, circa 1990.
My Uncle Ray used to be a professional photographer, but this was just a quick snap that he got of us on the back porch of his old Chicago-style bungalow. He has since moved (many years ago now), but the photo still hangs in his dining room. Poster-sized.
It’s one of my favorite photos ever.
p.s. My Uncle Ray is the reason we chose Ray for August’s middle name.
This post on photography tips is brought to you by your fellow photo lovers at Shutterfly. They encourage you to capture your memories and share your amazing pictures the way you want with their new Custom Path photo books.
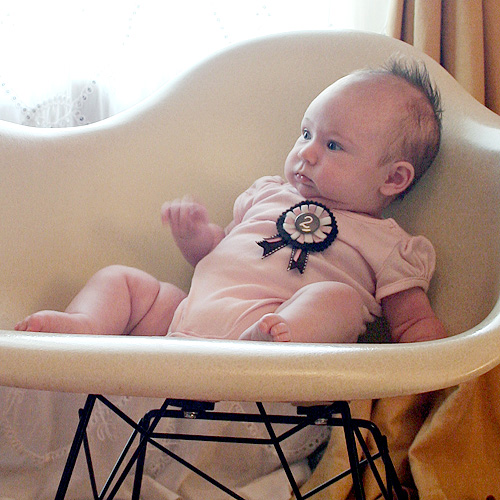
Photographing Eleanor, and now August, in a monthly series has been one of the best experiences I’ve had. Babies grow so quickly, and I’m glad that I had the foresight to capture them as they grew up. I love it when I hear that other people have been inspired to do their own versions, and so today I’m sharing a few of my tips for getting the most out of a photo series to document your baby’s growth.
Doing these photo shoots in the same spot at the same time and on the same date hasn’t been easy, but it has been worth it. Were there times that I felt like skipping a day? Oh yes. Plenty of times! But now, looking back at the photos, I realized that some of those difficult shoots (we had to go somewhere, the lighting was bad, Eleanor was cranky, August was crying, etc.) were some of the most memorable for me. I intended to create a keepsake to show my kids’ growth, but I also captured memories. Look at month twenty two, for example.
That face! That was the face of a brand new big sister. (We think she’s a bit happier about the situation now.) And then of course August was crying in his first photo. But little things like that make the photos more memorable.
Each month as I photograph August, I like to compare his photo to that of his sister’s when she was the same age.
Eleanor and August, Each at Two Months Old
And now that Eleanor has turned two, I’m able to compare her first photo with her last. She grew a bit, eh?
Eleanor, From a Baby to Two Years Old
Tips for Setting Up a Photo Series to Document Your Baby
Determine how often you would like to shoot.
Weekly photos would be fun, but a lot of work. Can you commit to that for an entire year (52 photos)? I found monthly photos for two years to be just right. That’s enough photos to show change, but not so many that it became an overwhelming chore.
Don’t slack.
If you’re doing a photo every month on the 1st, for example, don’t slack and think that you can just get it the next day (or the day after that…). Forcing yourself to do it on the proper day will ensure that you don’t fall behind, and you may associate stronger memories with the photos (as I unexpectedly did).
Consistency is key.
Find a spot that will stay as consistent as possible for the duration of your photo project. I chose the living room for Eleanor and the library for August because those rooms were already finished and not up for any major overhauls. You could also choose a fabric backdrop, the floor (a fluffy flokati rug would be cute), a giant Stendig calendar, whatever. I did allow for different flowers in the background of each photo to reference the seasons, but everything else stayed the same. Consistency puts the focus on the one changing element: your baby.
Keep a sense of scale.
I chose a chair so that I could see how my kids grew into it. People often like to put a big stuffed animal in the photo, and it looks much smaller by the time you’re a year or two into the project.
Make it fun for your baby.
A stuffed animal for scale is also a good idea because as your baby grows, he or she will have something to play with in the photo (which is really cute). My babies get to use the setting itself: a rocking chair. I have some great shots of Eleanor rocking like crazy, and she thought it was great fun to sit in the chair.
Plan ahead.
Choose a simple outfit, and buy it in multiple sizes ahead of time. Again, this puts the focus on your baby, not the constantly changing outfits. Also, keeping it simple will help keep it timeless.
Make your mark.
I made a felt pin for each of my kids, and I’ve changed the center out with the number for each month. A lot of people like to put a number right on a onesie (real or added with Photoshop), but you could also do something as simple as writing on a piece of paper. If you use the giant calendar idea, you’ve already got this tip covered.
Be snap happy.
Take more photos than you think you may need, especially if you’re shooting digital. Even if you think you got the perfect photo after just a few shots, take more. I like to aim for 50-100 in each session. I made a fun timelapse video of one of my shoots, so you can see how many photos I take!
I did it! I stuck with the whole series! Now what?
You could hang the photos as decorations for your baby’s first birthday party, arrange them into a grid and make a poster, print the photos and arrange them in an album, or make a book. The photos would be appreciated by the baby’s grandparents too, so you may want to plan on making multiples of whatever you choose to do with them.
It was my intention from the beginning to create a book for Eleanor when her monthly photos were finished. I will do the same for August. I originally thought that I would use just one photo from each month for the book. However, I found that it was fun to include a few of the outtakes too, and I was grateful that I had many extra shots each month to choose from. Here’s one of Eleanor’s photos from when she was two months old that you haven’t seen yet.
Look at that hair! Awesome. That wasn’t the photo I chose for that month, but I did make sure to include it in her book.
I’m still photographing August monthly (he’ll be four months old tomorrow), but I’m also going to continue photographing Eleanor every six months. Have you done a photo series with your children, or do you plan to someday when you have kids? Please do! You’ll love having the photos to look back on.
Babies are awesome. When they’re sleepy, you can put them down, run downstairs to cut out some barbells from construction paper, grab your camera, arrange your prop above your sleeping baby, stand on a chair, and take a picture.
This post on photography tips is brought to you by your fellow photo lovers at Shutterfly. They encourage you to capture your memories and share your amazing pictures the way you want with their new Custom Path photo books.
I’ve learned a lot about photographing my home over the last several years. I look back at some of my early shots of the house (like the photos in this post featuring my library), and I cringe at how bad they are. Today I’m going to share all of my tips and tricks with you so that you don’t make the same mistakes I did! You can make just one of these adjustments to improve your shots, or you can combine several changes to really make a difference.
Tripod vs. Handheld
Use a tripod. Always. That’s rule number one, because it’s that important. Rule number two should be to turn off your flash.
Don’t Just Stand There
A lot of people make the mistake of taking pictures from a standing position. It looks amateurish. It’s far better to crouch down just a bit and lower your tripod. (You are using a tripod, right? Rule number one!) Photographing a room from a lower angle makes the ceilings look higher and eliminates weird perspectives from above.
Depth of Field
Want that pretty effect where the subject is in focus and the background is nice and soft? You want shallow depth of field. You use a wide aperture (small F-stop number) to get it. Want everything in focus and sharp? Use a higher number F-stop for deeper depth of field.
Lights On, Lights Off
This comes down to personal preference. My library has been photographed a couple of times by professionals (here and here), and one photographer turned off every light while the other turned them all on (and brought in a few more). I like the look of the photo above with the lights on, but the one with the lights off has truer colors. (Yes, the ceiling is a soft green.)
Proper Exposure
I was focusing on the same spot (the pillow), but that window was making the whole room look backlit. When I first photographed the library in 2007, all of my pictures had this exposure problem, but I had no idea how to fix it (other than trying like mad with Photoshop, to so-so results). I got a better shot here by keeping the aperture the same (to maintain the same depth of field), and decreasing the shutter speed to keep the shutter open longer and let more light in.
Practice Makes Perfect
I’ve been blogging about my home since 2007, so I’ve had a lot of practice and a lot of time to improve. Hopefully these tips will help you get a jump on your own photos and you can avoid some of my early mistakes!
Eventually I want to reshoot some of my older pictures. I would love to make a photo book of my house, maybe featuring a bunch of before and after shots (now that I can take better “after” shots!). Or wouldn’t it be great to make a book for you or your kids to remember their home by if you were moving to a new house? I would have loved a memento like that of my childhood home.
Are any of these tips new to you? Or do you have any you’d like to add?
I’ve been focusing a lot on photography lately. I learned how to use my camera in manual mode as part of my Thirty Before 30 list, and then I improved my skills with a Photo 101 course. I finally feel like I know what I’m doing, but I’ve realized that I’ve reached my camera’s limitations.
My trusty Canon Rebel XT (350D) has been good to me. Yes, there have been a million improvements on it since mine came out in 2005, but I never felt the need to upgrade until now. My camera is only 8 megapixels, and I can’t go above ISO 400 without noticeable noise (not that the camera goes above 1600 anyway). Our bungalow is dark and taking photos inside has been challenging, so I’m looking for better ISO performance (and better quality overall).
It seems like every blogger with a fancy camera is using a Canon 5D, and I assumed I would upgrade to one as well. Except the more I did my research, the more the Canon 7D started to sound really good. It even does some things better than the 5D (a faster frame rate, and 19 focus points instead of 9, to name a few). Yes, the 5D is a full-frame camera, and it performs exceedingly well in low-light situations, but I think I’m going to be very happy with the 7D for years to come. I may upgrade further to a 5D eventually, but in the meantime I can invest in lenses.
Speaking of lenses, I have the nifty fifty, and I also have a Tamron 28-75mm f/2.8 XR Di Lens. The Tamron was purchased a few months ago as an upgrade to my Rebel’s kit lens while I save for a Canon 24-105mm f/4L IS USM AF. (I think.) The Tamron is a great, inexpensive lens, and I’m excited about using it with my 7D.
I have a post planned for later this month about taking photos of your home, so I’ll take a little time to get to know my new camera before then and I’ll let you know how it is. Now, I’d love to hear from all of you… Are you using a point and shoot, or do you have a DSLR? I’m not a pro (yet), but I can try to answer any questions you may have. I feel like I’ve learned so much even though I used to find all of the information overwhelming, and I want others to know that they can learn it too.