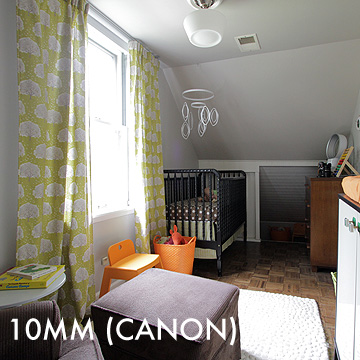
Archive - Projects RSS Feed

The Porch Rug (Revisited)

I thought I’d talk about painting the porch rug in a bit more detail today. So many of you loved the project (thanks!), and it really is something that can be easily done in your own home if you’re so inclined.

front porch before and after

I started by sketching the pattern on paper first. As I had mentioned before, I was inspired by a rug from Urban Outfitters (no longer available) and the flower petal patterns my Grandma Rose used to draw with me.

Gathering Ideas for the Front Porch

Once we were ready to begin, Brandon and I cleaned the porch and marked off the area for the rug with painter’s tape. We didn’t sand the floor first, though I’d recommend it if you have the time. Two coats of the base color (green) came next, and then it was time to figure out how to get the pattern drawn out on a large scale.

Painted Rug in Progress

I ended up putting in some rough guidelines with white chalk. I focused on placing the flower centers where I wanted them and then sketching out the general movement of the petals from there. I then painted everything freehand, stepping back every so often to make sure that the petal shapes and sizes were remaining consistent.

Painted Rug in Progress

If you’re considering a similar project, I’d say just go for it! It’s just paint — you’ll get a huge impact for very little money. And painting the rug while nine months pregnant was difficult (to say the least), but if I was able to handle it then the more able-bodied among you should have no problem!

Front Porch

If you liked my porch redo (all done in 48 hours with just $500), please take a moment to vote for it. There are two and a half weeks left, and I’d really appreciate your support during this time. And remember, you can vote once each day!

How To Make a Hanging Divider

First, I want to thank you all for your support in the 48-Hour Challenge! Our porch is back in the lead again, but it’s close and every vote definitely counts. Thank you all, especially those of you that are voting every day from now until June 12! I really appreciate it.

Today, I thought I’d explain how to make the hanging divider that we created for our front porch.

Front Porch

Materials

  • 2′x4′ piece of hardboard
  • two wooden dowel rods
  • s-hooks
  • chain
  • paint

Tools

  • table saw (or circular saw, or jig saw)
  • drill
  • cabinet knob template
  • pencil
  • paint brush

How To…

You can do something symmetrical or random, so it’s helpful to plan out a pattern (you can use graph paper) before beginning. We started by cutting our hardboard into long strips (3″ wide), and then cutting the strips into shorter pieces (ours were 6″ and 10″ long).

Table Saw

Once we had our pieces cut, we made marks for our hooks using a cabinet knob template. After drilling for the holes, we painted the front and back of each piece.

Hanging Divider Pieces

We assembled the strips with s-hooks and hung the whole thing from a dowel rod and some chain. We also added another dowel rod along the bottom for more stability. We’re actually planning to reinforce the connections with wire to help the divider weather strong winds. If the hooks were easier to bend, we would have bent the ends to hold it all together a bit better. If you’re using the divider indoors though, the extra step wouldn’t be necessary.

Hanging Divider

There you have it! And you can easily customize the project by making it more random, switching up the colors, using different shapes, and so on. You can even add in other materials — there are great metal parts in the plumbing section of any home improvement store. I hope that inspires some of you to try your hand at your own hanging divider!

Front Porch

Icicles and Ornaments

There are some spectacular icicles on all of the houses in my neighborhood. Very pretty, and also a little scary (I worry when Brandon goes out to shovel).

Icicles and Ornaments

I made those paper ornaments a couple of years ago (based on the instructions from design*sponge), but I don’t think they’ve shown up in any of my photographs before. I love the way they look with the icicles behind them.

No More Popcorn Ceiling

The popcorn has given way to a smooth, flat ceiling, thanks to Brandon’s hard work. As I mentioned before, the ceiling did not contain asbestos (always check before removing because many popcorn ceilings do), so we felt comfortable trying to remove it. It came down easily enough in just a few hours (he sprayed it with water and scraped it off), but smoothing the resulting mess took a little longer. He did a rough sanding (60 grit) first, wiped all of the dust away with a damp cloth, smoothed over all of the imperfections with joint compound, and then sanded everything again (220 grit).

I’m the more handy one out of the two of us and I felt bad that I couldn’t help, but we didn’t think it was a safe job for a pregnant lady. Oh yeah, I’m also a wee bit of a perfectionist… It was really hard to not go in there and obsessively sand and smooth and do things myself. After priming and painting though, the ceiling looks really good.

Popcorn Ceiling, Before and After

The Formerly Popcorn, Now Smooth Ceiling

The new light looks great, though we did have to run out and grab a ceiling medallion. I’m not really a fan of them, but Brandon had a hard time smoothing out the ceiling near the light, and the medallion was an easy solution to hide the remaining popcorn texture. I haven’t decided yet if I’ll leave it white or if I’ll paint it the same color as the rest of the ceiling.

Now, I know people get a bit nervous when dealing with electrical projects (we do too), but changing a light fixture is EASY. We’ve done it six times so far in this house (in the living room, dining room, kitchen, bathroom, studio, and nursery). You just make sure the power is off, take down the old fixture, connect like wires to like wires, attach the ground wire to the little green screw on the mounting bar, and then attach the new fixture.

We decided to keep the room the same color (Wheat Bread by Behr), but it needed a second coat of paint. Really, it’s always needed that second coat, but I think I was too tired when working on the guest room before and I just figured ‘good enough’ (which is so uncharacteristic of me). It has bugged me ever since. So now we’ve painted the ceiling and walls, and even did some touch up work on the trim, and the guest room is officially ready to be switched over to a nursery.

Page 23 of 30« First...«2122232425»...Last »