

Fabric Twist Ties in Gifted
Have you looked at Gifted yet? It's the newest e-magazine on the block, put out by the talented and lovely…November 3, 2010
Happy Halloween from Olivia
Eleanor loves Olivia, so we dressed her as her porcine heroine for Halloween this year. Eleanor's pig nose was drawn…October 31, 2010
Getting Ready for Halloween
I'll be doing a bit of crafting and sewing today, putting Eleanor's Halloween costume together. I'm making it a little…October 28, 2010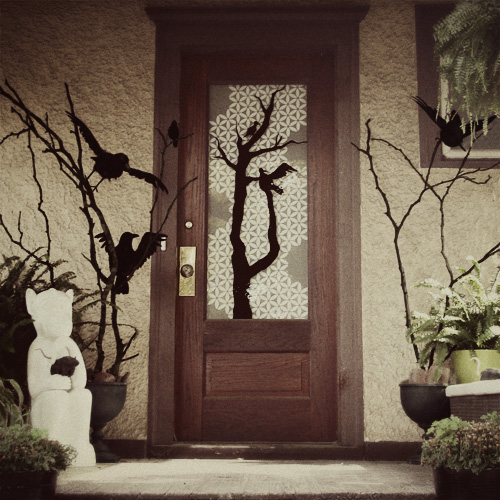
Spooky Halloween Front Porch for BHG
My fourth and final project for Better Homes & Gardens can finally be revealed! I decorated our front porch for…October 26, 2010
Modern Pumpkin Lanterns for BHG
I crafted three modern pumpkin lanterns for my third Better Homes & Gardens project. I painted them in various metallics,…October 21, 2010
Quick New Curtains
I whipped up a couple of new curtains yesterday for the front door and window using an ANNO LJUV sheer…October 15, 2010
Fabric Twist Ties in Gifted
Have you looked at Gifted yet? It’s the newest e-magazine on the block, put out by the talented and lovely Ez of Creature Comforts. I…
Happy Halloween from Olivia
Eleanor loves Olivia, so we dressed her as her porcine heroine for Halloween this year. Eleanor’s pig nose was drawn on with liquid eyeliner, which…
Getting Ready for Halloween
I’ll be doing a bit of crafting and sewing today, putting Eleanor’s Halloween costume together. I’m making it a little easier on myself this year…
Spooky Halloween Front Porch for BHG
My fourth and final project for Better Homes & Gardens can finally be revealed! I decorated our front porch for Halloween with 2D and 3D…
Modern Pumpkin Lanterns for BHG
I crafted three modern pumpkin lanterns for my third Better Homes & Gardens project. I painted them in various metallics, and all three are hot…
Quick New Curtains
I whipped up a couple of new curtains yesterday for the front door and window using an ANNO LJUV sheer panel from IKEA. The fabric…