Category: Projects

  • Tibet Almond Stick

    Tibet Almond Stick

    We’re keeping our dining table. The consensus seemed to be that the Strut table I had my eye on, while beautiful, is prone to scratches. We have enough of those already, thank you.

    The kids and the cats have both been doing a number on our beautiful vintage table, but it does still clean up nicely. My mother-in-law gave me a Tibet Almond Stick for the surface scratches in the wood that the cats are so fond of creating. It’s basically an oily bunch of cloth in a tube, but it does help.

  • The “I’m a Giant!” Challenge

    The “I’m a Giant!” Challenge

    I’ve really been feeling the urge to just start decorating a whole new house from scratch. I love our home, but there’s something to be said for starting at the beginning again. So I’m going for it. A whole new house!

    OK, a whole new dollhouse. Is it weird to be as excited as I am about this? Because I am very, very excited here.

    Emily Henderson is putting together the biggest little challenge in blogland: The “I’m a Giant” challenge. Here are the bloggers participating:

    …And you! We would love to see what everyone else out there can come up with. Oh man, Etsy. Prepare thyself for the onslaught of searches for dollhouse furniture.

    “Eleanor is going to have a really awesome dollhouse someday.”

    That’s what I said two years ago when Brandon gave me the miniature designer chairs that you see above. So I have a good start, but dollhouses are not furnished in chairs alone. I’ll be looking for miniature furniture, making things, bringing in lots of color and pattern, and decorating my heart out. I loved making shoebox dioramas and decorating my dollhouse when I was a kid, I loved creating models when I was studying architecture, and I’m going to love this challenge. I’m doing this for me, but also for Eleanor and August. I want to create something so magical for them that not only will they love it, they’ll also want to share it with their kids and tell them about how their mom made it.

    I adore the way Emily describes the challenge.

    It’s like a virtual Quilting Bee. Just a bunch of people crafting together and not making each other feel weird. Let’s not be ashamed of having a ‘hobby’. Let’s not be afraid to love the detail that goes into miniatures, the workmanship, the obsession. It’s a forgotten craft that we are going to give its due respect.

    There are big plans to organize a show in LA of the finished houses, and we’d like to feature your projects there and on our blogs. So, do you want to get in on the fun? We’re going to start now and finish our houses by December 15. Of course we’ll all be sharing our progress as we go. I’m using a Walton dollhouse courtesy of Melissa and Doug for the challenge (and they’re offering 15% off with the code DH15 if you want to use one of theirs too). You could also make one, get your own, or maybe find a vintage house that needs some love. It doesn’t even have to be a traditional dollhouse, or even a room! Think art project. Think conceptual. Just think of something, because we want you to play along too. We want to spread some fun, see some creativity, and work on a big internet craft project. Together.

    Obviously I’m in. Are you?

  • Paint-by-Numbers, Giant Wall Mural Inspiration

    Paint-by-Numbers, Giant Wall Mural Inspiration

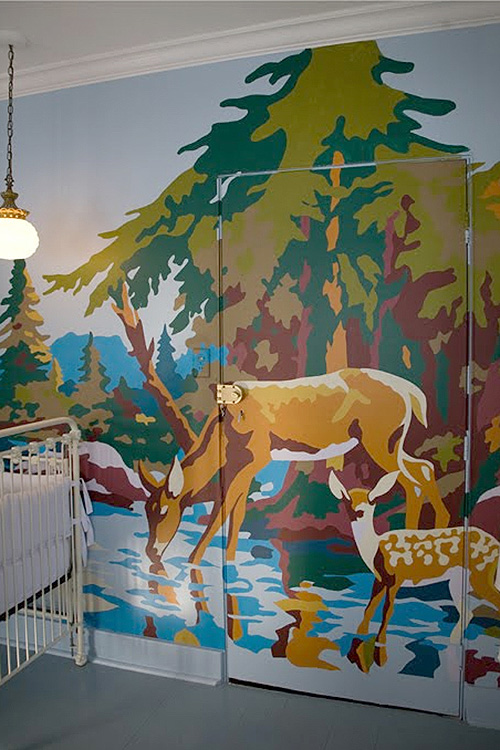
    I’ve painted original murals before for my nephews, but it’s been a while. These giant paint-by-numbers murals have me inspired though, maybe enough to actually commit to making one! It might be something fun to do in the play room area of the basement.

    – Camp Wandawega

    – Camp Wandawega

    – Curtis Robertson

    – Camp Collective for Etsy

    – Scott and Cheryl White

    I don’t think it would be difficult, but it would be incredibly time-consuming. Here’s a peek at the process…

    – Curtis Robertson

    – Cabin Collective

    – Cabin Collective

    A crazy amount of work. I think the results are just the right amount of cheesy goodness though! You like? Or are they too cheesy for you?

  • ONA Brooklyn Camera Bag (Giveaway)

    ONA Brooklyn Camera Bag (Giveaway)

    ONA wrote to me after I had featured their Brooklyn Camera Bag in a roundup of cute camera bags, offering one to me for review. They’d also like to give one away to one of my lucky readers!

    The bag is beautiful, and I can fit my camera inside with my nifty fifty attached, plus two other lenses. I like that there’s a big pocket along the outside to hold a notebook or an iPad, and then a smaller pocket under the flap to hold essentials (I carry a cute business card holder instead of my usual wallet, keys, my phone, a pen, and lipstick). The leather is thick and holds its shape well, and the interior padded compartments are adjustable so you can get a good fit for your gear. The buckles are pretty, but buckles can be tricky to undo in a hurry. Here, they’re actually a cover for quick-release clasps that can be done and undone with one hand. Smart!

    I have another camera bag that is adorable, but this one is a better foil for all of my dresses. Plus I like that the strap allows the bag to be worn as a cross-body, since you can see that I usually have my hands full.

    Win a Brooklyn Camera Bag

    Would you like one too? ONA would like to give away a Brooklyn Camera Bag to one lucky Making it Lovely reader!

    Leave a comment on this post to enter. One entry per person, open to U.S. and international entrants, and you can have your choice of color (black or chestnut). The giveaway ends Friday, September 2 at midnight CST, and a winner will be selected randomly. Good luck!

    p.s. You can keep up with ONA by liking their Facebook page.

    Congratulations to Julie, commenter #457 and winner of the camera bag!

  • My Newly Redone Office

    My Newly Redone Office

    I’ve spent the last month working on redecorating my home office. I partnered with Sherwin-Williams, using the new HGTV® HOME by Sherwin-Williams color collections and paint and a $1000 budget. Want to see how it turned out?

    I think it’s looking really cute. Let’s take a closer look at each of the issues I addressed…

    The Rug Vs. the Chair

    The existing zigzag rug stayed, and I managed to find an affordable used Eames Management chair. In pink, no less! I would like to reupholster it someday, but I can rock the eighties’ dusty rose for a while.

    The Computer (and the Wall Behind it)

    The old computer that was sitting behind my new one (a silly thing to do) is now in the basement, and I’ll be setting up a desk down there for it eventually. I cleaned up the cords beneath my desk and from the desk to the printer behind me as well.

    I chose art to go above the computer that could actually be seen, and moved the mirror (that was half-blocked) to the adjacent wall. The bird painting is by Amy Ruppel, the portait was from Paul Ferney, and the wall sculptures were discussed here.

    Storage and Organization

    I had to empty the huge shelving unit to paint the wall behind it (what a pain in the rear that was). The good thing about that though was that it forced me to rethink the way I put everything back. I was able to go through a lot of the books and things that I had on the shelves, and I pared it all down. Then I added some matching baskets along the bottom to make the toys look nicer, and I didn’t need to do anything further to organize my things.

    The Curtain as a Closet Door

    The curtain is gone! A door was fitted and hung for the closet, which cost more than I had anticipated and took a third of the budget. I love it though! A curtain for a door is fine, and a lot of people like that solution, but a true door feels more polished and keeps the kids and cats out. I painted the door the same color (“Snowbound,” #SW 7004 / LL17, semi-gloss) as the rest of the trim .

    The Window

    I painted the window white as well and chose to hang simple curtains from IKEA that match the wall color. I also planned to add a sheer roller shade, but my usual go-to (Enje shades) are unavailable right now.

    Painting the Trim and the Walls

    I used the new line of paint from HGTV® HOME by Sherwin-Williams for the office. The walls are “Contented” (#SW 6191 / LL12, flat finish) from the Livable Luxe collection, and I painted all of the trim “Snowbound” (#SW 7004 / LL17, semi-gloss), a white from the same color collection. The wall color is that hard to define color between green, blue, and gray, and it seems to be popping up everywhere these days. The color was a bit of a departure for me, but as I narrowed down my paint swatches, I kept finding myself drawn to it.

    Lighting

    The old ceiling fan that came with the house had seen better days. I still love the Jonathan Adler light that I chose for my former studio (now Eleanor’s room), so I picked up another to swap the office ceiling fan out for.

    A Place for the Kids

    I spend a lot of time in my office, so I was sure to include space for Eleanor and August to play. The small table and chairs are light enough to move them out of the way, but Eleanor loves coloring or playing there.

    There you have it!

    I love the way the office turned out. The office in our old apartment was pink, and when Brandon and I moved here, I chose the exact same color to quickly get my office ready. After nearly a decade with a pink office, I’m still getting used to the new color but I’m loving the white trim and the closet door. It feels good to have the space freshened up.

  • How I Repaired a Tear in My Chair’s Upholstery

    How I Repaired a Tear in My Chair’s Upholstery

    I wrote about the floor model chair that I picked up for half-off yesterday. It had a 2″ tear along the top (not along a seam), and I asked if it seemed like something that can be fixed.

    I called Anthropologie to see if they could offer a better discount (no), but they did say that I could still return the chair even after attempting to fix it, so I figured I had nothing to lose by trying. Many of you recommended keeping the orange chair that we already own, and having it reupholstered for a new look. I like the shape of the new chair more though, I love the fabric, and if I sell the orange chair I can essentially swap chairs at no cost. Then if I decided to reupholster the new chair at some point, I’m not out any more money than I would be had I reupholstered the orange one.


    [ 1, 2, 3 ]

    I went to the fabric store for mending supplies and came home with an embroidery hoop and some fabric to practice on, various liquid stitch adhesives, Fray Check, curved needles, iron-on patches, and several types of thread and embroidery floss.

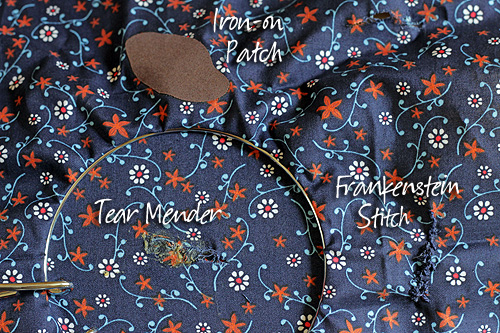
    I stretched my scrap fabric on the hoop and jabbed at it with scissors to recreate the upholstery tear. I frayed the edges too for good measure. Then I got to work trying out various methods, keeping the fabric stretched tight on the hoop to simulate the conditions of the fabric stretched tight across the chair back. Here are the methods that I (a novice) used.

    Method 1: Darning Upholstery with a Looped Stitch

    First, I applied Fray Check, as recommended by this upholstery darning tutorial. Then I used a heavy-weight thread that matched the fabric, and started with a looped stitch. I’ll let my play-by-play Twitter updates tell the story here.
    [blackbirdpie url=”http://twitter.com/#!/makingitlovely/status/98945229838749697″]
    [blackbirdpie url=”http://twitter.com/#!/makingitlovely/status/98947933138993152″]
    [blackbirdpie url=”http://twitter.com/#!/makingitlovely/status/98950876621836288″]
    OK, I was trying to be cute with that last bit. The Frankenstein stitching was somewhat charming, but not enough to actually use it on the chair. And I did figure it out toward the end, but it still wasn’t a good enough fix and I was worried that the extra tension would eventually rip the fabric further.

    Method 2: Trying to Glue the Fabric Back Together

    I thought that I could slip a little fabric under the tear and then glue in back together. I had actually called a local upholsterer for advice and this was the technique that they recommended, so I tried it. Messy and awful. The worst of it was a product I found (that sounded promising!) called Tear Mender. It was a rubber-cement like adhesive that smelled awful and gummed up my fabric. I think it could be great for thicker fabric or leather, but it was terrible for my linen. I tried a few other liquid stitch products, but none with good results.

    Method 3: Patching the Fabric

    There were two options for patching. One: I could cut out a matching portion of fabric from my chair’s armrest covers, glue it over the tear or iron it on with fusible mending tape, apply Fray Check to the ends, then stitch around the patch to secure. Or option two: slap an iron-on patch over the rip. To my surprise, the easier option worked! The patch fuses completely to the fabric, bonding to the ripped portion and preventing the tear from getting worse. And even better, the edges of the mending patch won’t fray so there’s no need to stitch around the edge (which calls more attention to the repair).

    It’s not invisible (and I never expected that it would be), but it looks like it’s just part of the chair’s busy pattern. And as I had mentioned, the tear takes away some of the chair’s preciousness, which isn’t such a bad thing. I could even blend the patch by using fabric paint to match the pattern, but I don’t think that will be necessary.

    One Last Option

    I can pile on the pillows and a throw blanket. Sure, there’s no room to sit, but look how cute it is.

    I kid! The chair’s going to be just fine.