Tag: upholstery

  • Reupholstering My Floral Chair with Calico

    Reupholstering My Floral Chair with Calico

    Sponsored by Calico


    I loved my loud floral armchair. It was a floor model, and there was a small rip in the linen fabric when I bought it. I experimented with ways to fix it, ultimately landing on a patch that blended pretty well! I was proud of my handiwork, and the chair was really cute in our last home and in this one.

    Ten years on though, the fabric on the seat had started to look a bit threadbare. It went from noticeably “hmmm” to “oh no” pretty quickly and it was beyond my abilities to repair any further. But I still loved the chair! No need to replace and treat it as disposable — it was time to reupholster.

    Ripped Linen Chair Fabric

    I visited Calico in Hinsdale and worked with Linda (she was so helpful!) to pull fabric options. Calico’s design services are free, and you can make an appointment for your local store. There’s a whole before and after gallery to get you inspired, and you can request a reupholstery quote too. Calico reupholsters more than 10,000 furniture pieces every year!

    At our appointment, Linda had pointed me toward a floral very similar in feel to what the chair had. It would have been sort of a floral 2.0 update, and it was definitely in the running, but we looked at options for changing it up too.

    Fabric Swatches at Calico Corners

    Calico lets you borrow their fabric samples so you can be sure they look right on the piece you want to reupholster, and so that you can make sure they work with the rest of your home. I rethought a couple of my top choices after seeing them with the rest of my furniture. I like the armchair being in our bedroom (a pretty neutral backdrop), but wanted to keep the option to use it downstairs if I feel like rearranging at some point.

    Calico Corners Fabric Samples at Home | Making it Lovely

    I felt like I was close to choosing, but on a follow-up visit, I noticed a print I hadn’t seen before. Like little granny squares? I had to borrow the sample to see. I did a Photoshop mockup for both too.

    Calico Corners Fabric Options - Granny Squares Scalamandre and Bold Floral
    French Fauteuil Crapaud Napolean Armchairs | Calico Corners, Making it Lovely

    Floral 2.0 (Cassaro Luxe Collection Passion Fruit) or little granny squares (Scalamandré Kirov)? I went back and forth, but the little granny squares charmed me. I returned my fabric samples and placed my order with Linda. Calico handled everything from getting the fabric in, picking up the chair, having it reupholstered (including some freshening up of the foam padding), and then having it delivered again.

    My chair! She’s so cute! It looks perfect.

    Reupholstered Armchair from Calico Corners | Making it Lovely
    Calico Corners Fabric Samples at Home | Making it Lovely
    Armchair Calico Corners Kirov Scalamandre Fabric Reupholstered | Making it Lovely

    Having a piece reupholstered is so fun. You get to fall in love with a piece all over again. It was cute and quirky for ten years, and now it can be cute and quirky in a different way for the next ten years! And in better shape, too.

    Floral Armchair Before | Making it Lovely
    Reupholstered Chair with Calico Corners | Making it Lovely
  • Protecting Our Upholstery

    Protecting Our Upholstery

    hr 644

    Remember the pair of chairs in our living room? The ones that I mentioned were the recipient once of a nice dousing with orange soda?

    Protecting Light-Colored Upholstery #LoveYourThings #Scotchgard

    Yep, those are the ones. We usually only eat or drink at the dining room table, but the soda was spilled during a party when we were being more lax (and by an adult, not one of the kids!). We got to it right away and luckily it came up without staining, but it wasn’t a good feeling to worry that the upholstery might have been ruined by one little accident.

    I hadn’t taken any steps to protect them, even after that incident, until after I started working with Scotchgard Brand. I’d heard of them before (most of us probably have), but I hadn’t used any of their products or seen them in action so it didn’t cross my mind that it was an option. When I met with their team and was able to see a few demos, I realized how helpful it would have been for my chairs! Scotchgard Protectors don’t change the look or feel of your fabric at all, and you would never know a fabric had been treated unless you were to spill on it. Liquids bead up on the surface, so if something spills you have a little leeway to go get a towel and clean things up before anything soaks through.

    Using #Scotchgard Protectors for Light Upholstery #LoveYourThings

    #Scotchgard Repels Liquids #LoveYourThings

    I used Scotchgard Fabric and Upholstery Protector starting with the front of each chair and moving my way towards the backs with a single can. Come over and spill all over my things! They have magic forcefields now. Or at least it seems like they do.

    Protecting Upholstery with #Scotchgard #LoveYourThings

    How to Protect Light Upholstery with #Scotchgard #LoveYourThings

    hr 644
    I am a compensated Scotchgard Brand-sponsored blogger. Opinions are my own and additional products used in the project were selected by me.

  • The Spruce Upholstery Book, and Plans for August’s Bed

    The Spruce Upholstery Book, and Plans for August’s Bed

    I know how to upholster a simple chair seat. Years of Trading Spaces viewings taught me to start with a staple in the center, pull the fabric taut to the opposite side, staple, and work out from there. Beyond that though? I don’t know. Stick some batting in there under the fabric if you’re feeling fancy, and call it a day? And forget about webbing and springs. That wasn’t covered by Hildi. Of course, my lack of knowledge in this area didn’t stop me from purchasing an inexpensive wooden framed bed for August’s room, with the intent to upholster it.

    I waffled between several blue fabric choices, but I fell for a design with tree slices during a recent trip to IKEA. The color palette is neutral, and I’m thinking of it as a manly take on polka dots. You know, for my manly two-year-old.

    Boy's Bed Upholstery Fabric

    I felt like I could approach the project with my limited sewing skill set and do a decent job, but I wanted to do an amazing! job. I searched for tutorials online, but there are a lot of people out there putting out a lot of tutorials with questionable methods. Then I heard word that Spruce’s Amanda Brown was coming out with a book (Spruce: A Step-by-Step Guide to Upholstery and Design), so when I was asked to take part in her online book tour, I agreed.

    The book is divided among five key projects, and from those, you can adapt the techniques to whichever piece you want to work on. It’s thorough and covers what I would consider to be complex reupholstering jobs, but everything feels doable rather than overwhelming. I’m paying close attention to the section on the frame of a three-seater sofa, as it’s pretty close to what I’ll be doing to the bed.

    Upholstering a Sofa

    Win a Copy of the Book!

    Do you have any upholstering to do? The Spruce book tour and classes are about to start, and they’re also holding a giveaway with their “Ugliest Chair” contest on Facebook right now.

    I received a copy of the book for review, but I’m also giving a copy away. Just leave a comment below to enter*, and I’ll choose a winner at random. Good luck! And be sure to visit the other blogs participating in the online book tour.
    Spruce: A Step-by-Step Guide to Upholstery and Design

    Open to US residents only, 18 and over. Ends Friday at midnight, CT.

    *The giveaway has ended. Congratulations to the winner, Annie!

  • How I Repaired a Tear in My Chair’s Upholstery

    How I Repaired a Tear in My Chair’s Upholstery

    I wrote about the floor model chair that I picked up for half-off yesterday. It had a 2″ tear along the top (not along a seam), and I asked if it seemed like something that can be fixed.

    I called Anthropologie to see if they could offer a better discount (no), but they did say that I could still return the chair even after attempting to fix it, so I figured I had nothing to lose by trying. Many of you recommended keeping the orange chair that we already own, and having it reupholstered for a new look. I like the shape of the new chair more though, I love the fabric, and if I sell the orange chair I can essentially swap chairs at no cost. Then if I decided to reupholster the new chair at some point, I’m not out any more money than I would be had I reupholstered the orange one.


    [ 1, 2, 3 ]

    I went to the fabric store for mending supplies and came home with an embroidery hoop and some fabric to practice on, various liquid stitch adhesives, Fray Check, curved needles, iron-on patches, and several types of thread and embroidery floss.

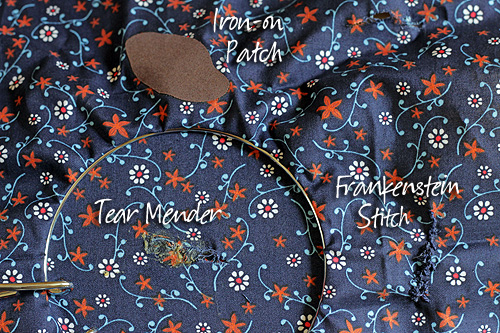
    I stretched my scrap fabric on the hoop and jabbed at it with scissors to recreate the upholstery tear. I frayed the edges too for good measure. Then I got to work trying out various methods, keeping the fabric stretched tight on the hoop to simulate the conditions of the fabric stretched tight across the chair back. Here are the methods that I (a novice) used.

    Method 1: Darning Upholstery with a Looped Stitch

    First, I applied Fray Check, as recommended by this upholstery darning tutorial. Then I used a heavy-weight thread that matched the fabric, and started with a looped stitch. I’ll let my play-by-play Twitter updates tell the story here.
    [blackbirdpie url=”http://twitter.com/#!/makingitlovely/status/98945229838749697″]
    [blackbirdpie url=”http://twitter.com/#!/makingitlovely/status/98947933138993152″]
    [blackbirdpie url=”http://twitter.com/#!/makingitlovely/status/98950876621836288″]
    OK, I was trying to be cute with that last bit. The Frankenstein stitching was somewhat charming, but not enough to actually use it on the chair. And I did figure it out toward the end, but it still wasn’t a good enough fix and I was worried that the extra tension would eventually rip the fabric further.

    Method 2: Trying to Glue the Fabric Back Together

    I thought that I could slip a little fabric under the tear and then glue in back together. I had actually called a local upholsterer for advice and this was the technique that they recommended, so I tried it. Messy and awful. The worst of it was a product I found (that sounded promising!) called Tear Mender. It was a rubber-cement like adhesive that smelled awful and gummed up my fabric. I think it could be great for thicker fabric or leather, but it was terrible for my linen. I tried a few other liquid stitch products, but none with good results.

    Method 3: Patching the Fabric

    There were two options for patching. One: I could cut out a matching portion of fabric from my chair’s armrest covers, glue it over the tear or iron it on with fusible mending tape, apply Fray Check to the ends, then stitch around the patch to secure. Or option two: slap an iron-on patch over the rip. To my surprise, the easier option worked! The patch fuses completely to the fabric, bonding to the ripped portion and preventing the tear from getting worse. And even better, the edges of the mending patch won’t fray so there’s no need to stitch around the edge (which calls more attention to the repair).

    It’s not invisible (and I never expected that it would be), but it looks like it’s just part of the chair’s busy pattern. And as I had mentioned, the tear takes away some of the chair’s preciousness, which isn’t such a bad thing. I could even blend the patch by using fabric paint to match the pattern, but I don’t think that will be necessary.

    One Last Option

    I can pile on the pillows and a throw blanket. Sure, there’s no room to sit, but look how cute it is.

    I kid! The chair’s going to be just fine.