This post on photography tips is brought to you by your fellow photo lovers at Shutterfly. They encourage you to capture your memories and share your amazing pictures the way you want with their new Custom Path photo books.
I’ve learned a lot about photographing my home over the last several years. I look back at some of my early shots of the house (like the photos in this post featuring my library), and I cringe at how bad they are. Today I’m going to share all of my tips and tricks with you so that you don’t make the same mistakes I did! You can make just one of these adjustments to improve your shots, or you can combine several changes to really make a difference.
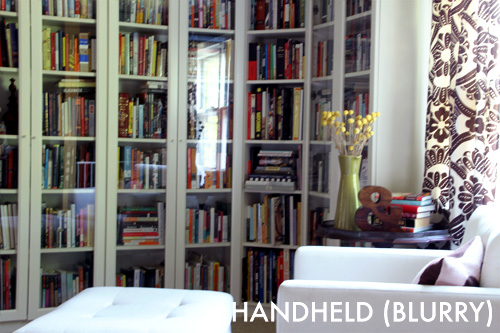
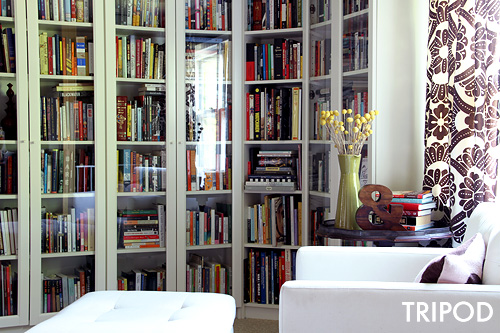
Tripod vs. Handheld
Use a tripod. Always. That’s rule number one, because it’s that important. Rule number two should be to turn off your flash.
Don’t Just Stand There
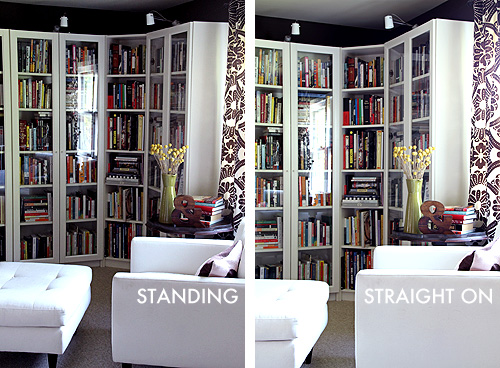
A lot of people make the mistake of taking pictures from a standing position. It looks amateurish. It’s far better to crouch down just a bit and lower your tripod. (You are using a tripod, right? Rule number one!) Photographing a room from a lower angle makes the ceilings look higher and eliminates weird perspectives from above.
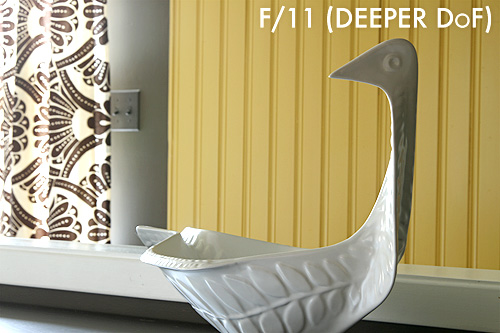
Depth of Field
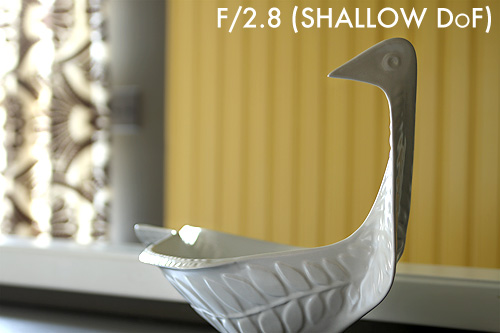
Want that pretty effect where the subject is in focus and the background is nice and soft? You want shallow depth of field. You use a wide aperture (small F-stop number) to get it. Want everything in focus and sharp? Use a higher number F-stop for deeper depth of field.
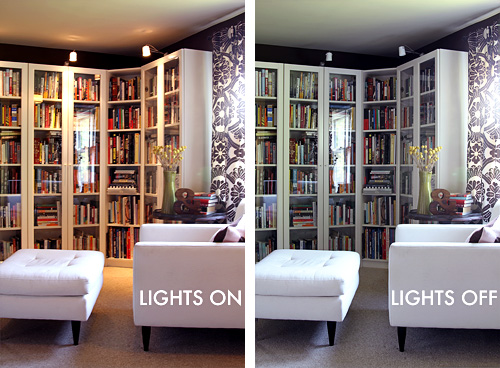
Lights On, Lights Off
This comes down to personal preference. My library has been photographed a couple of times by professionals (here and here), and one photographer turned off every light while the other turned them all on (and brought in a few more). I like the look of the photo above with the lights on, but the one with the lights off has truer colors. (Yes, the ceiling is a soft green.)
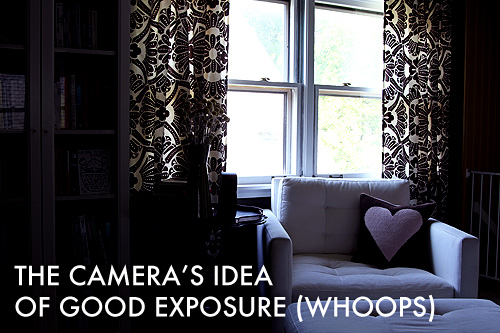
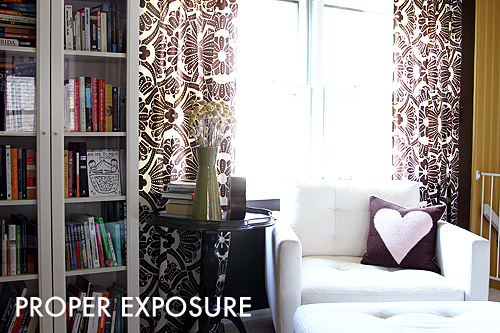
Proper Exposure
I was focusing on the same spot (the pillow), but that window was making the whole room look backlit. When I first photographed the library in 2007, all of my pictures had this exposure problem, but I had no idea how to fix it (other than trying like mad with Photoshop, to so-so results). I got a better shot here by keeping the aperture the same (to maintain the same depth of field), and decreasing the shutter speed to keep the shutter open longer and let more light in.
Practice Makes Perfect
I’ve been blogging about my home since 2007, so I’ve had a lot of practice and a lot of time to improve. Hopefully these tips will help you get a jump on your own photos and you can avoid some of my early mistakes!
Eventually I want to reshoot some of my older pictures. I would love to make a photo book of my house, maybe featuring a bunch of before and after shots (now that I can take better “after” shots!). Or wouldn’t it be great to make a book for you or your kids to remember their home by if you were moving to a new house? I would have loved a memento like that of my childhood home.
Are any of these tips new to you? Or do you have any you’d like to add?



Katie
May 31, 2011 at 8:48 amAll the important things I forgot from college photography class. Thanks for the great reminders.
Cristina
May 31, 2011 at 9:35 amHAHA I was thinking the EXACT same thing!
Mary Beth
May 31, 2011 at 8:52 amI love the idea of making a photo book of your home for your children to enjoy in the future. I would dearly love to have photo books for the home of my childhood and my grandmothers’ homes. These are the sort of ideas that get lost in the rush of daily life and then, in the future, one mourns the lost opportunity. Go for it…your children will love you all the more for your thoughtfulness.
Mary Beth
Making it Lovely
May 31, 2011 at 9:19 amI would love to have photos of my grandparents’ homes too.
Wendy
May 31, 2011 at 8:54 amGreat tips Nicole, thank you! Having a blog of my own makes me more aware of taking good pictures these days. Funny – I asked for a tripod for my birthday (next week)!
Emily
May 31, 2011 at 8:55 amWhat a great list of tips! I just upgraded my camera to a DSLR but it’s been sitting all by itself for a while because photography can be so overwhelming. These are a great start…off to go dig out the tripod!
Kelly
May 31, 2011 at 8:59 amNice, I need all the help I can get! I still am in AV mode on my DSLR
Making it Lovely
May 31, 2011 at 9:22 amThat’s not bad! I shot in the AV and TV modes forever before finally switching to manual.
Naomi
May 31, 2011 at 9:03 amI just have one tip: If you are able to shoot from outside a window (window open, screen off), it’ll give you more space to work with. I do this usually with a wide-angle lens to add to the effect.
I do this often with newborn and small child sessions to give a sense of scale and smallness.
Making it Lovely
May 31, 2011 at 9:24 amI like that idea. I’d have to stand on a ladder though!
Midwest Magnolia - Melissa Lewis
May 31, 2011 at 9:03 amGreat Photography post. I am bookmarking it as a resource for when I get my first SLR camera, which hopefully won’t be too far from now!
jamie
May 31, 2011 at 9:15 amSOOOOO helpful! i unfortunately don’t have an SLR but this is great to bookmark!
Making it Lovely
May 31, 2011 at 9:23 amMost of the tips still apply to any camera! And a lot of point-and-shoots even let you control the shutter or aperture.
Kathy
May 31, 2011 at 9:28 amGreat tips……..Thanks Nicole.
But where did you get that wonderful bird/swan dish?
It’s fabulous.
Thanks,
-Kathy
Making it Lovely
May 31, 2011 at 9:55 amIt’s by Jonathan Adler. It was a Christmas gift from Brandon a couple of years ago!
Giulia
May 31, 2011 at 9:36 amI find the window the most difficult situation. You want the details of the actual curtains, chair, pillow etc, but I also don’t like the blown out window background. Sometime switching angles can help, I find.
Using the proper lens depending on the shot is important as well – using a 50 mm lens to capture the whole room won’t give you enough room to capture it.
I find a picture of a room looks different than how you perceive it three dimensionally. Look through the lens to see what you’ll capture, sometimes moving things closer together than how you have them set up normally will make the photo look much better.
Making it Lovely
May 31, 2011 at 9:56 amWindows are by far the trickiest. I think I can still stand to make a few improvements, but certainly I’ve gotten better than I used to be. Thanks for bringing up the other tips too.
Elissa
June 1, 2011 at 6:56 amI once went to an architectural photography seminar that, admittedly, relied a lot on photoshop, but he recommended taking photos with windows at a few different exposures. then he would photoshop the correctly exposed window (the first photo) into the correctly exposed room (second photo). You obviously need a tripod to get the angles identical, and some practice so that the photoshopping isn’t obvious, but it can look pretty good!
Catherine
May 31, 2011 at 9:36 amThank you SO much. I’ve read a few blog posts on taking indoor pics and they are typically so full of lingo I don’t understand that I can’t make sense of them. This makes sense – – and the only tip I’d read before was to keep the flash off. I especially appreciate the exposure tip. Our house is dark and if there ever is light, my pics seem to end up even darker. Thank you!
Making it Lovely
May 31, 2011 at 9:58 amI’m so glad! I was aiming to make the tips as easy to understand as possible.
iris
May 31, 2011 at 10:05 amOh, an important rule (especially if you’re keeping the flash off) is to only take photos during the daytime. Natural light is kinda useful for that.
Additionally, I’ve found I can use flash, but you have to bounce the flash off the ceiling or the wall (I use a cheaper flash gun with lots of freedom of motion for that.)
Making it Lovely
May 31, 2011 at 10:07 amYes! Definitely wait for the best natural light!
I’d like to play around with an external flash in the future. Thanks for sharing yours.
Tanya from Dans le Townhouse
May 31, 2011 at 10:05 amGreat tips! But I think your “bad” library photos from your earlier post look pretty darn good to me!
Jennie
May 31, 2011 at 10:37 amSuch great advice! Thank you!
Jill Browning
May 31, 2011 at 11:18 amThank you for this post! Looking into a tripod now!!
Alison @ The Peacock Diaries
May 31, 2011 at 11:22 amThank you! I will be subletting my apartment this fall and I have been worried about being able to photograph its 400 sq ft of splendor adequately. I am signed up for a Nicole’s Class in July (again, thanks to you!), but this is definitely a great resource.
I’d like you to do a post on reading my mind…I’m wondering how you do it. Because you are always writing about exactly what I need!
Lizzie @ Pretty City Things
May 31, 2011 at 11:27 amGreat post – I am guilty of at least a couple of those camera crimes! Thanks!
Charlotte
May 31, 2011 at 11:32 amThanks so much for the great tips! They will be very helpful. Now I guess I need to learn how to use more features on hubby’s fancy camera…
Kristin
May 31, 2011 at 11:55 amLove this, thank you! I need to learn the manual settings. But for now my bother set up the av and tv modes to take better pics than auto. I will def. Be trying out some of your tips.
Making it Lovely
June 1, 2011 at 9:11 amI learned my camera in the AV and TV modes before jumping to fully manual. It’s a great way to get more comfortable with the settings.
Carla
May 31, 2011 at 12:13 pmThis is hugely helpful! Thanks!
Michelle
May 31, 2011 at 12:18 pmWhat camera do you use? It looks like a canon in other photos. Can you make any recommendations?
Making it Lovely
June 1, 2011 at 9:12 amI have a new Canon 7D (that’s what I used for these photos). Before that I had a Canon Rebel XT (350D), and I also have a G10.
Michelle
June 14, 2011 at 1:26 pmoh great! thanks I think i might start out with the Canon Rebel XT. We are having a baby (well any day now) and this would be a great gift for the Mister.
RLG
May 31, 2011 at 1:42 pmyou are awesome.
thank you for this post.
xoxo
samantha
May 31, 2011 at 1:54 pmJust seconds ago I was trying to get a good photo of my newly decorated living room, thanks for these tips I will try them out. :)
Alison
May 31, 2011 at 2:22 pmThank you!! Your photo tips are so helpful and easy to understand – and the best part: they seem do-able (not like some of the confusing things you read in manuals or other blogs). I also want to try the online photo class you suggested a while back (as I just got a shiny new Nikon!).
itziar
May 31, 2011 at 2:29 pmGreat ideas!
But we need a home like yours to get such an amazing photos…
Amanda
May 31, 2011 at 3:17 pmGreat tips – thank you so much! All very helpful :)
heather e.
May 31, 2011 at 3:30 pmthanks so much for this post…we’ve just started a blog about our new home, and our photography skills are definitely lacking. this will be a BIG help! :)
Sarah
May 31, 2011 at 3:59 pmThis is *just* what I needed to see this morning. I started a blog about our adventures as first time home owners (it’s been 1 month) and my pictures have been driving me crazy. I keep photographing the same room over and over trying to get rid of the blurry/dark spots and this is going to be sooo helpful.
THANKS!
Lauren-Ashley
May 31, 2011 at 5:56 pmI’m so glad I read this. These are excellent tip that are easy for me to understand, I definitely will be using them.
Kate
May 31, 2011 at 8:16 pmGreat tips! I am hoping to dip into photography into the near future and take lots of pictures of my own home!
Nick Klaus
May 31, 2011 at 8:34 pmThe great thing about digital is that you can experiment to your hearts content, and if none of the photos turn out, you can always delete them.
If you’re afraid of using the manual mode, the easiest trick is to set the camera to AV or TV, see what the camera says you should use and then enter those values into manual mode. After a while, you start to get a feel for what settings should go with the look you’re going for. There’s also a helpful meter at the bottom of the viewfinder, if you look for it.
Making it Lovely
June 1, 2011 at 9:14 amExactly. That’s how I got more comfortable with my camera.
Lauren L.
May 31, 2011 at 10:10 pmGreat post! Do they make tripods for point and shoot cameras? I have a little Cannon while I am saving up for my first SLR.
Making it Lovely
June 1, 2011 at 9:14 amAs long as your camera has a place for the tripod head to screw into (and most cameras do), you can use a tripod.
Joi
May 31, 2011 at 10:42 pmThanks for the tips! This confirmed my thoughts that I definitely need a tripod! I have the shakes at 28! Oops!
Kate
May 31, 2011 at 10:50 pmHi Nicole! That was really helpful. And very timely, I put up my first photo of my living room today. I’d love a post from you on “Five Important Tips for Styling”. Your pix always look amazing.
G
May 31, 2011 at 10:52 pmThanks ! Love this post and love that you took 2 pictures to show each point ! It shows the difference each change makes. Awesome post !
emma
June 1, 2011 at 2:55 amGreat tips!!!
Thanks for sharing its.
Filipa
June 1, 2011 at 3:00 amHi
what a great post and blog.
I didnt understand how u do the ” proper exposure”.
Can u explain it?
I have a canon DSLR
Béa
June 1, 2011 at 3:12 amThanks³
Nat@ dear little house
June 1, 2011 at 3:23 amBracketing your shots can save you a bunch of time too! Also, never trust the screen on the camera and don’t delete until you’re on the computer.
PS I’m having a photography giveaway on my blog if you’re interested :)
Alicia
June 1, 2011 at 1:14 pmThis is SO helpful and timely for me – I just realized this week that I need a tripod ASAP. Do you have any tripod recommendations? It seems they span from $20 up to over $1000 and everything in between. I really don’t want to spend a lot, but wonder if there’s a base level that I should look at for use with my Nikon D50. I’m not planning to use any super-heavy lenses.
thanks!
Sheesham Furniture
June 1, 2011 at 3:18 pmGreat tips, thank you. I will be sure to use these when photographing rooms in the future.
A handy tip for when you don’t have a tripod (I always forget mine): Use any stable surface to hold the camera and make sure to use the timer function so you don’t get any camera shake. If there’s no stable surface, hold your breath and use your chest to steady the camera (or the top of your belly if you’re a 17st chap like me).
meryl rose
June 1, 2011 at 6:22 pmI make a photo book every year with Blurb for my boyfriend as a present. I put the book together like a story by including bits and pieces of text from my blog and his webpage. I’ve only been doing it a few years and it’s always so fun to look through.
Danielle
June 2, 2011 at 12:27 amThanks so much for these tips! I will definitely utilize my DSLR a little better now.
CPB
June 2, 2011 at 11:03 amGreat post Nicole, thanks.
An easy oversight to make, especially when the room is your own is not de-cluttering. Don’t go over the top; you still want a welcoming, lived-in look, but the devil is in the detail.
Also, think about adding some human interest. Using a tripod and a longer exposure, experiment by having somebody (with your camera on timer, it might be you) walk through the shot. Because of the slow shutter speed, they’ll blur, adding an interesting effect. Just make sure they’re in the background, not the main focus. Tough to get right first time, but that’s the beauty of shooting digital.
elissa @ faucethead
June 2, 2011 at 11:44 amthese are great tips. sometimes i think it’s easy to assume that better equipment will get you better results but there’s so much you can do to manipulate a space without it!
How to be better at photography « lovecitron
June 2, 2011 at 4:12 pm[…] Making It Lovely has a great post about the most important tips for taking photos of your home. […]
Jane
June 3, 2011 at 6:19 amThank you so much for these tips! Interior photography has been much of a mystery for me.
link love – 6.3.11
June 3, 2011 at 10:51 am[…] Tips for Photographing Your Home on Making it Lovely – This is something I continue to struggle with, mostly because the lighting is so hard to get right. I’m finally ready to take the big nursery reveal photos, so the timing of Nicole’s tips couldn’t be better. Hopefully they turn out well! […]
CALLOOH CALLAY » Blog Archive » {weekend links} June 2nd Edition
June 3, 2011 at 2:54 pm[…] Tips on photographing your home by Making It Lovely […]
Sarah MacMillan
June 3, 2011 at 11:00 pmThanks for these great tips! I’ve been trying to get some decent shots of my home for a while now. Interior photography is hard! But with these tips I now feel better prepared and inspired. Try try try again.
becky
June 7, 2011 at 10:19 amThis was EXTREMELY interesting and helpful. Thanks!
Michelle
June 8, 2011 at 1:10 amThanks so much for the tips! I was only thinking to myself how horrible the photos on our blog are and how come everyone else’s blog photos look so amazing. Now I can try these out and maybe improve the pics :-)
EM
June 8, 2011 at 6:02 pmThanks for the tips! Also, when using a tripod, I’ll take multiple shots at different exposures and photoshop the best parts of each (to fix things like the blown out window and chair). Of course sometimes it’s more work than it’s worth
A picture paints a thousand words | Our DIY Dream
June 8, 2011 at 7:48 pm[…] I discovered a blog post that hopefully will change my life. Nicole over at Making it Lovely has some great tips for us budding photographers out there. Rule number one – use a […]
Kauniita valokuvia kodista
June 13, 2011 at 1:09 pm[…] ihanan yksinkertaiset ohjeet asunnon valokuvaamiseen Making it Lovely -blogista. Nämä oh Filed under Uncategorized. Bookmark […]
Rosa @ flutterflutter
June 13, 2011 at 2:45 pmJust started blogging in November, and just got a DSLR two weeks ago… time to start figuring this stuff out! Thanks for all your tips!!
jennifer@nicolejanehome
June 14, 2011 at 12:55 pmThanks so much for the tips. You just summed up what my 10-week photography course taught. Well done!
Theresa Furey
June 24, 2011 at 6:45 pmHi Nicole, while I think your photo tutorial is good. I don’t gree with everything you wrote. I don’t think you should always use a tripod. If you keep your above 60 you shouldn’t have a problem with blur. If you need more light to increase your shutter spped open your aperture ass far as possible (the lower numbers are more open, higher numbers less- ie. f2.8 is more open than a f11). Second on this point, is that if you do need to use assistance, you don’t need to run out and buy a tripod, a table and some books will do just fine or just as good and equally priced are monopods- much less hassle then setting up a tripod.
I completely agree with your don’t just stand there. Often the best and most attractive images are ones taken from a different point of view, which is why are eyes are drawn to them.
Lastly, exposure. Its always better to over expose then under by rule. This doesn’t mean white wash all your photos…that’s no good either. Blacks are harder to bring up then recovering from white. I find when shooting into the light set on manual that I always move my exposure setting to the left by four or five bars I get an accurate forground and background light representation. You definitely have to look at the images as your taking them and adjust according. If in doubt…snap it out. What I mean is take several shoots of the same thing playing with the exposure and nothing else, one will end up working and you learn from the whole process ;)
Hope this wasn’t to critical of me. Overall you did a great job explaining for the novice x
Best,
Theresa
Theresa Furey
June 24, 2011 at 6:50 pmHi Nicole, while I think your photo tutorial is good. I don’t gree with everything you wrote. I don’t think you should always use a tripod. If you keep your shutter speed above 60 you shouldn’t have a problem with blur. If you need more light to increase your shutter speed (above 60) or open your aperture as far as possible (the lower numbers are more open, higher numbers less- ie. f2.8 is more open than a f11). Remember if you are in manual shooting and increase your aperture, you’ll effect your shutter speed. Second on this point, is that if you do need to use assistance because you can’t raise your shutter speed above 60, you don’t need to run out and buy a tripod, a table and some books will do just fine or just as good and equally priced are monopods- much less hassle then setting up a tripod.
I completely agree with your don’t just stand there. Often the best and most attractive images are ones taken from a different point of view, which is why are eyes are drawn to them.
Lastly, exposure. Its always better to over expose then under by rule. This doesn’t mean white wash all your photos…that’s no good either. Blacks are harder to bring up then recovering from white. I find when shooting into the light set on manual that I always move my exposure setting to the left by four or five bars I get an accurate forground and background light representation. You definitely have to look at the images as your taking them and adjust according. AS I always say, if in doubt…snap it out. What I mean is take several shots of the same thing playing with the exposure and nothing else, one will end up working and you learn from the whole process ;)
Hope this wasn’t to critical of me. Overall you did a great job explaining for the novice x
Best,
Theresa
kylie
March 19, 2012 at 11:31 pmThank you, some great tips for us amateur photographers!!!!
How to be better at photography
May 3, 2013 at 3:45 pm[…] Making It Lovely has a great post about the most important tips for taking photos of your home. […]
20 Incredible Indoor Photography Tips And Tricks To Improve Your Skills - Geeks Zine
May 16, 2020 at 3:56 pm[…] down and lowering your tripod when taking interiors is a great photography trick that will help to create straighter lines and make the ceilings look […]